Tuesday 31 August 2021

Three Panel Pop out card - Gill Harrop


Three Panel Pop out card.

Instructions given for a 6 inch card. See end for 5'' inch and  5 x 7'' variations.

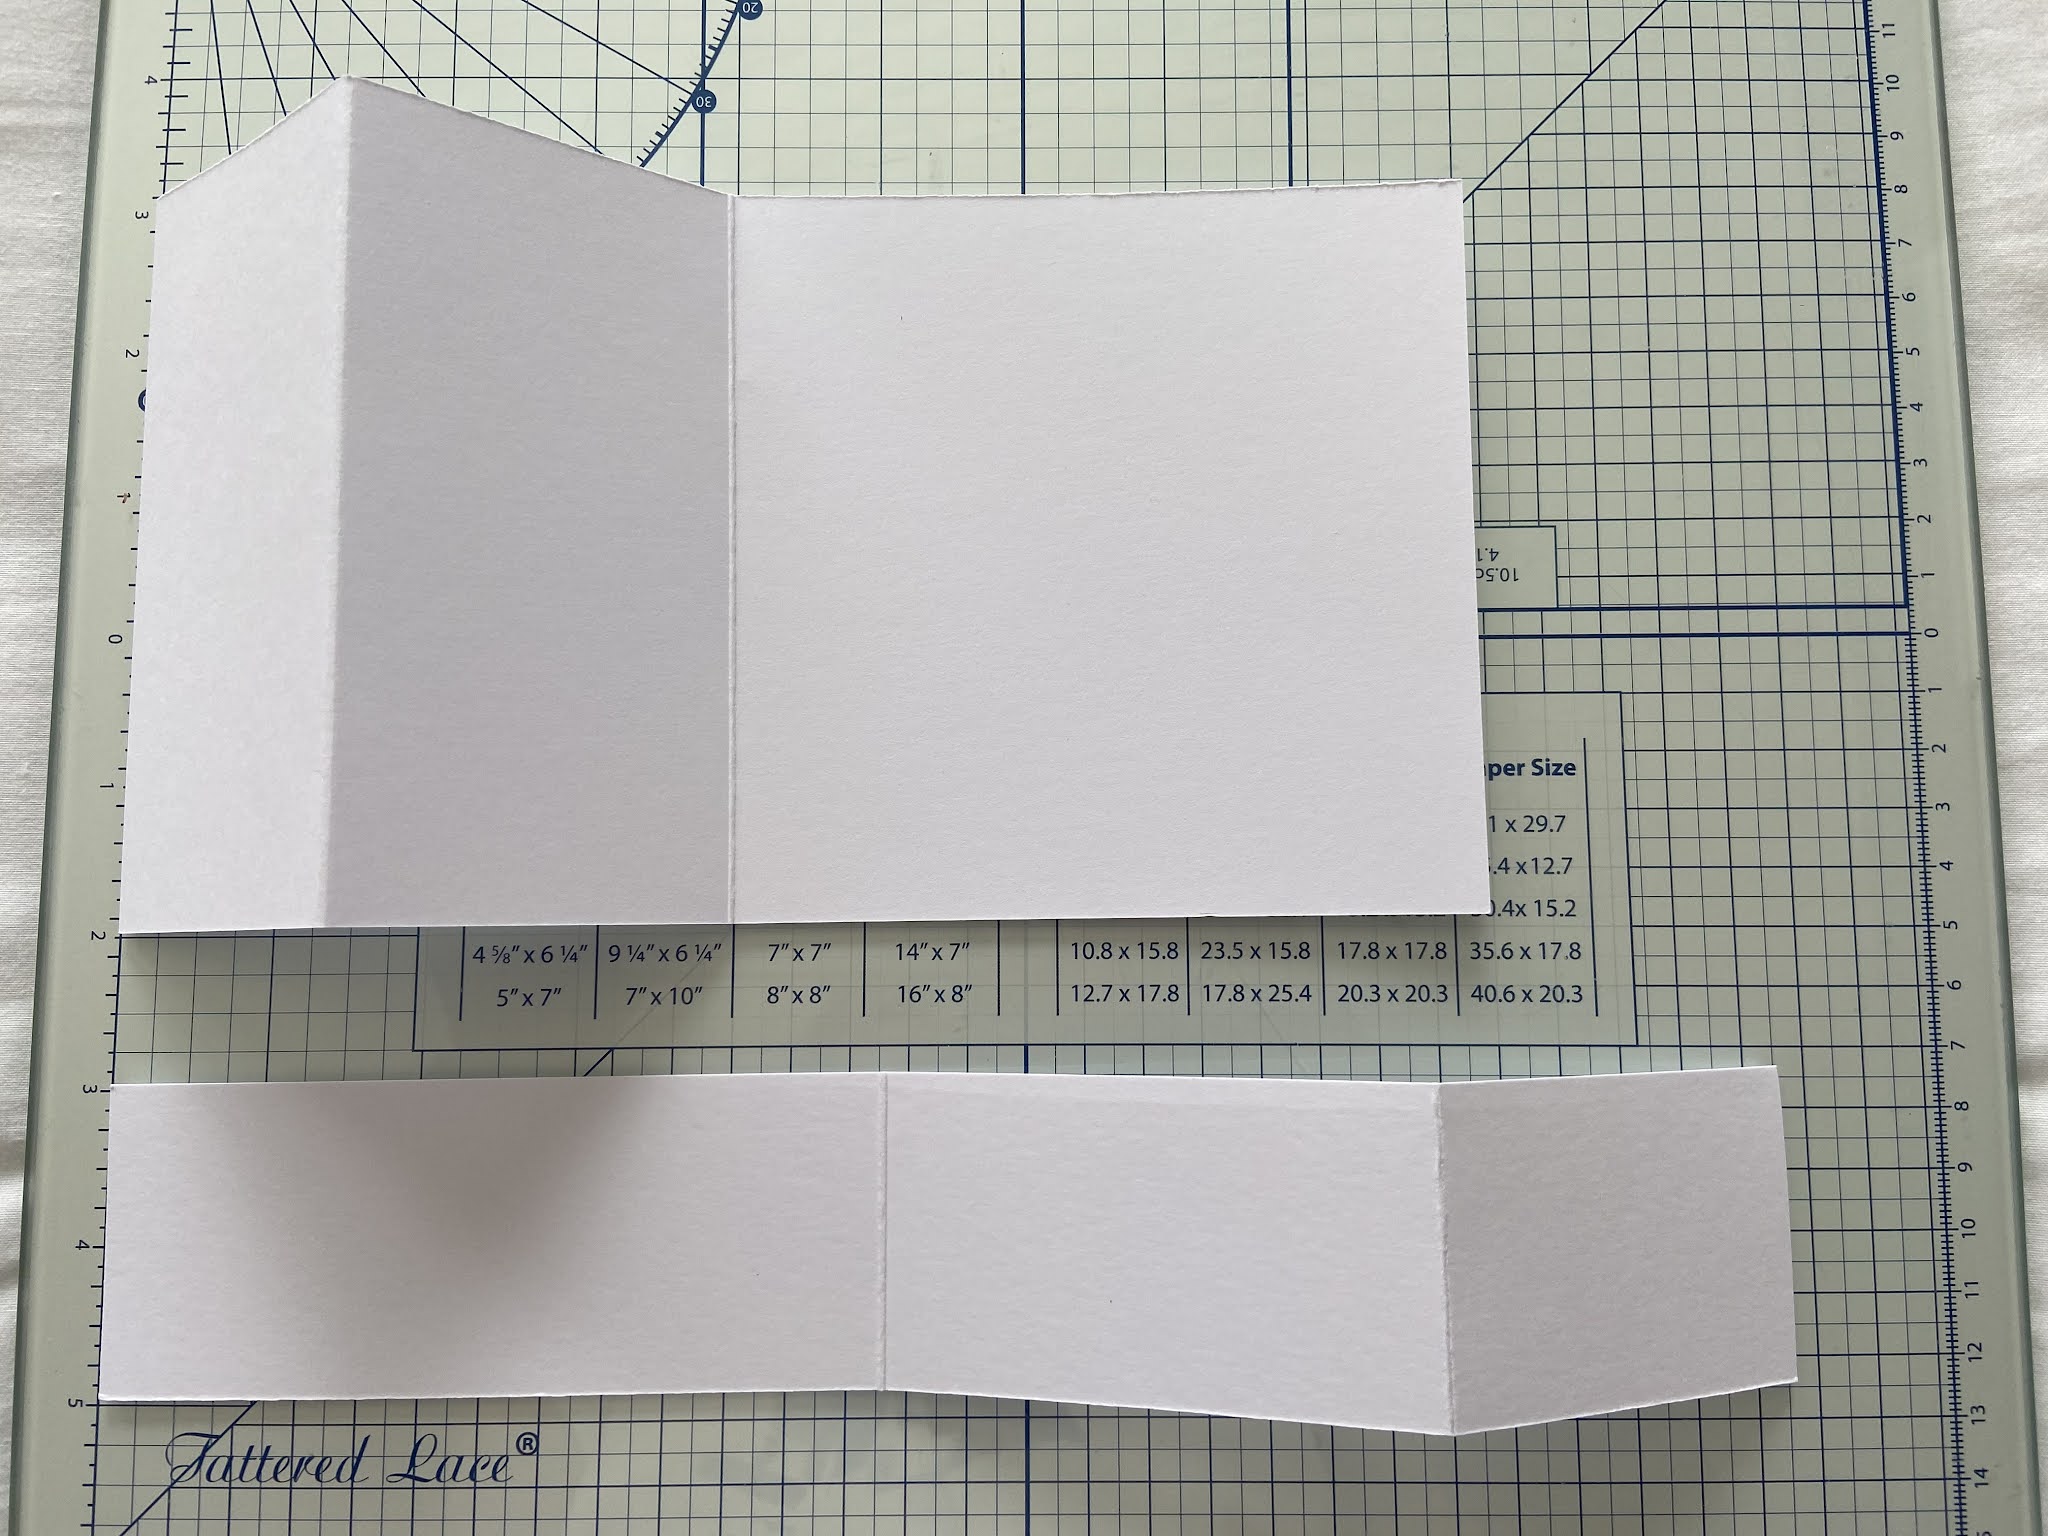
Take a piece of 12 x 12 inch cardstock – I used 250 gsm card.

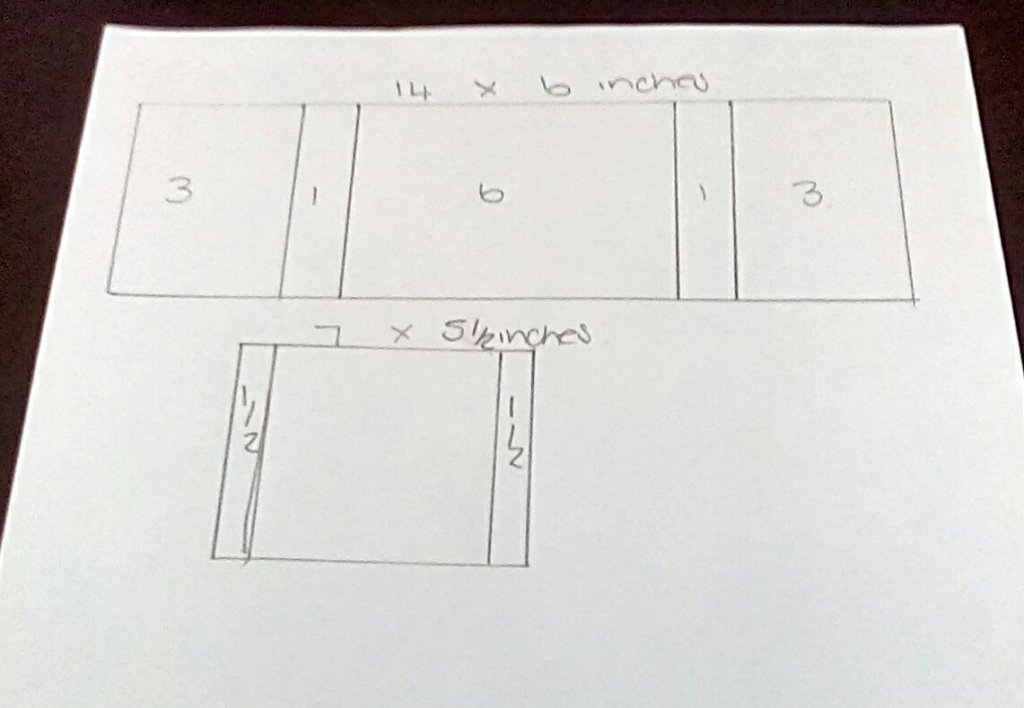
Score on one 12 inch side at 4 and 8 inches. Turn card 90 degrees and cut to a 12 x 6 inch piece. On this piece Fold .. from left side first score is mountain. Right score valley .

Decide how deep you want the ‘pop out’ panel to be. Mine is 4''. So cut remaining strip at 4 x 12 Again mountain and valley folds to match bigger piece.

Tip: Alternatively cut the 12 x 12 cardstock to 12 x 10 then score – that way you have a piece of 2 x 12 unscored- I usually add this to my white bits box and use for stamping.


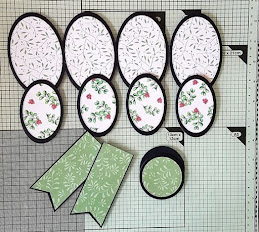
Mat and layer the larger piece panels. I left 1/8 inch all round.

Mat and layer the ‘pop out’ panel , again with a 1/8'' border all round.  Make up topper decorations but it’s easier to leave off any ‘topper’ decorations until you have assembled the card as required.

Tip: You could emboss part or all of these sections of the pop out. 

The back panel of the card is ideal for your sentiment, greeting words etc. If you will use the card straightaway it might be easier to add this panel with a sentiment now.


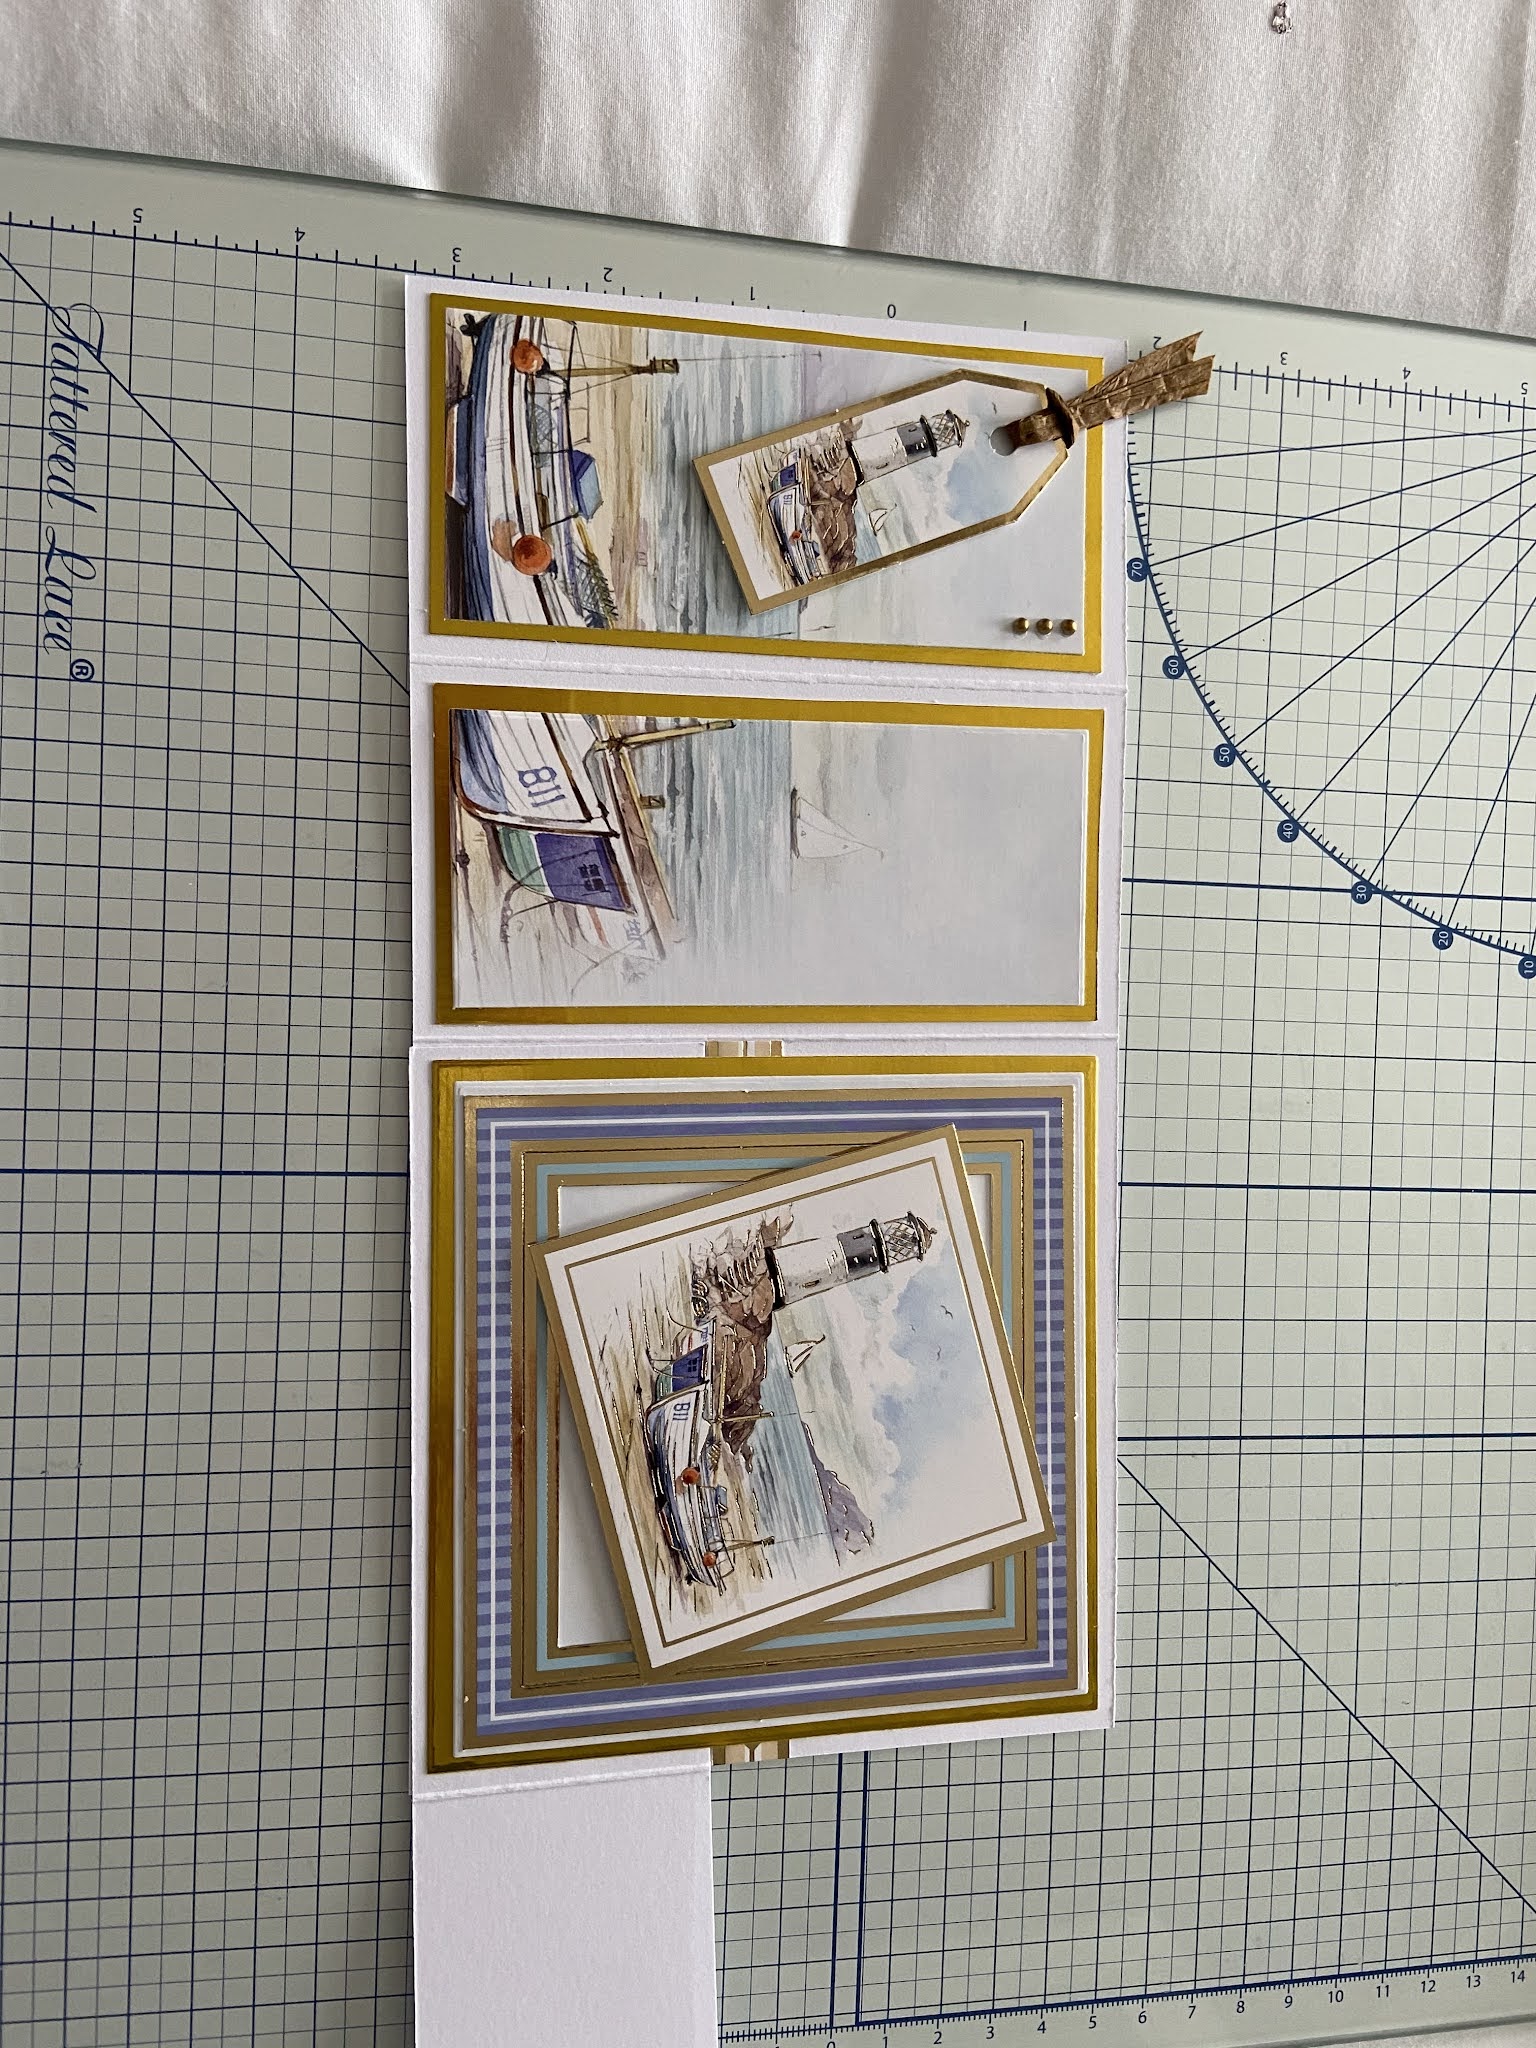
To add the ‘pop out’ panel. Start by getting the envelope you are going to use for the card - the idea is that the ‘pop out’ doesn't want to overhang the card to the extent it won’t fit in the envelope.

Lay the tall three-fold tall panel to the left of the envelope, leaving a slight gap from the edge.


Place the front section of the pop out front panel on top of the front fold of the main card piece i.e. tuck the other two parts under the front panel.

It is entirely up to you where it sits, but be careful not to put it too low or high as it could cause the card to be unbalanced and not stand up.

Tip: use wet glue that way it gives you some ‘wriggle’ room. I use Collall Multi-purpose glue.

Glue this front panel down, taking care not to place glue on the part that ‘overhangs’ the card.

Turn the card over carefully face down and glue the back panel, this one is much easier to do than the front. Glue as in the photo then fold the back part of the card over. Check its sitting straight, wriggle slightly as required.


Decorate and add toppers as required. I have used CWC 'Sew Lovely' papers and Candi - Very Merry Gold. The decorative toppers are also CWC. Backing paper Papermania. Rear sentiment is Stampin Up!


Variations on card sizes.

Using 12 x 12 card stock I have also made a 5 x 7 version where the card was scored the same at 4 and 8 inch then cut to 7 x 12. Cut the remaining strip at 4 1/4. x 12 Again mountain and valley folds to match bigger piece. Mat and layer. 1/8 inch decrease  all round. This card features just one shade of blue and to add texture and definition all panels are embossed.


Also because not everyone has 12 x 12 card you could use a piece of A4 card.


Cut on the long side to 11 ¼ inch .

Score along the long side at 3 ¾ , 7 ½ inches.

Cut on short side at 5 inches. This will give you two pieces 11 ¼ wide x 5 inches and 11 ¼ x 3 ¼ inches. Cut the mats and layers with a 1/8 inch border all round. All supplies - 'Highland Collection' from a magazine freebie.

This card design can also be up-scaled using A3 cardstock and the shape changed too following the same basic thirds principal.

Enjoy 😊 

;Gill x


Wednesday 25 August 2021

YVONNE MALLICK - TRIPLE EASEL CIRCLE CARD


Hi there.   Today I am showing my take on a triple circle easel card for this weeks Wednesday Wonder.

For my card, that fits into a C5 envelope, I used:-

3 x 10 1/2 cm fluted circles
6 x  9 cm fluted circles
3 x  8 cm plain circles


Place and glue the edge of one of the smaller fluted circles either side of one of the larger fluted circles... TOP TIP:  I found it easier to position these by laying all three circles on the envelope I was going to use to enable me to gauge the correct position 


Score two of the smaller fluted circles at 1 cm and one of the larger fluted circle at 1 1/2 cm to glue onto the base card as a hinge and each of these three circles at halfway, to make the folding easel mechanism 

Make the hinged scored circle into a mountain fold and glue the bottom half of the scored card to the bottom half of the remaining three fluted circles 


This is the basic card for you to decorate and add the stopper where best suits your personal  design.  I stamped the three plain circles before I stuck them onto the green base card and I used stamped rocks as my stoppers.

This folds down and fits into a C5 envelope


I hope you enjoy having a go at this card as it is much more simple than it looks!  Dont forget to tag me as I would love to see your makes 😊

Happy crafting
Crafty hugs 
Yvonne 😊

I also used:-

Frog and sentiment stamps by Personal Impressions
Reed stamps by inkylicious
Rock stamps by HobbyArt
Flowers by JND
Leaves by Sizzix 


Tuesday 17 August 2021

MOIRA YAKOVA- 3D BOW CARD


 Moira Yakova

3D Bow Card


This is the card I'd like to share with you for this week's Wednesday Wonder.  It's not a card to send in the post, but one to give in person to a special someone.  To make this card you will need:


A card blank, mine is a 7 x 7" card because I wanted to add mats and layers, but the bow sits comfortably on a 6 x 6
3 different patterned papers, plus a base colour to make the bow itself
4 oval die cuts approx 4" long for the base of the bigger loops
4 oval die cuts approx 3.5 " long for the mat
4 oval die cuts approx 3.25 " long for the base of the smaller loops
4 oval die cuts approx 3" long for the mat
2 circles approx 2.25" of your base colour
1 circle approx 2" of patterned paper
I've found that 160 gsm weight is best for making the bow as it manipulates well and holds it's shape
A strong wet glue and/or red liner tape/tape pen plus some foam pads


1.  Using wet glue adhere patterned paper to base paper ovals. Repeat with the bow "tails"and add patterned paper to one of your circles.  The bow tails are 1.75"wide by 4" long, just cut a little V shape at the bottom.


2.  Curve the ovals using a pencil or something which is cylindrical, the ovals should be rounded with no sharp fold.


3.  Apply strong glue to the bottom edge of each oval and pinch them together. I used these small bulldog clips to hold the edges together until they dried, as they need to be secure before you start to assemble your bow.  Other than that you can just hold them together until the glue dries.


4.  Now it's time to put your bow together !  This is when you decide what you want to do with the centre of your card, you can either use a pretty topper or, as I have in this case, use a flower to finish the centre off.  If you decide on a flower it should be the last thing to be attached to your card.

Using the smaller ovals first, apply glue to the bottom edge of the first oval and attach to the underside of your matted circle, the edge of the circle should just touch the patterned paper. Attach them close together as shown, first one side then the other.


5.  When the glue has dried, attach the larger ovals centrally behind the smaller ones, again keeping them close together.


6.  Using foam pads, attach your third circle to the base of your bow, positioning it directly over the circular topper.  
Curve the "tails" slightly and adhere them to the base of the bow as shown. the bow is now complete.

7.  Mat and layer your card base as you like, position the bow where you want it to be on the card front, and, using foam pads on the bottom circle of the bow, press down on the centre of the bow to adhere it to the card. Now you can attach your flower.  This card can be a little "front heavy" and I find that if I'm using a square card base, it's better to have it stand tent style.

I have used different base shapes for this card, and my favourite shape for it is an octagonal base, though I have used circles and hexagons too.  This is an octagonal one I made last year using the gorgeous Kanban Holly Hobbie Christmas Joy papers.  
The pretty papers I used for today's card are also from a Kanban collection called  Forest Friends. 
I hope you've enjoyed reading this, and would absolutely love it if some of you gave it a go.  Thank you so much for getting this far 💖


Wednesday 11 August 2021

JULIE WALKER-NAUTICAL OPEN Z FOLD CARD

I got the inspiration for this card from a lovely card I received from Mary Kelly, and I would like to once again thank her for both her card and the inspiration for this card.


Items used

Hunkydory - You Light Up My world, toppers and  1 backing sheet

1 Sheet gold card

Santorum Gorjuss paper ribbon

Colours Unlimited adhesive pearls

1 5” x 5” pre-scored card blank

    12.5cm x 12.5cm

I extra strip of card 2” x 11”

                                5cm x 28cm

Double-sided tape

Wet glue

Foam pads (optional)


Score the strip of card at 2 1/2” and 6”

                                        6.5cm and 15.2cm

Also, score the front of the card blank at 2 1/2”

                                                                 6.5cm


Mats and layers used

Card front 2 1/4” x 4 3/4” and 2” x 4 1/2”

                  5.75cm x 12cm and 5cm x 11.5cm

Middle of card 4 3/4” square and 4 1/2” square

                         12cm square and 11.5cm square

Band front panel 1 3/4” x 2 1/2” and 1 5/8” x 2 1/4”

                             4.5cm x 6.3cm and 4cm x 5.7cm

Band middle panel 1 3/4” x 3 1/4” and 1 5/8” x 3”

                                4.5cm x 8.3 cm and 4cm x 7.7cm


Method 

Attach the band of card to your card blank. I attached this onto the front of the inside of the card and slightly disguised this by adding ding a decorative band to my design, you could attach it this way or onto to the back of the card. I just preferred having a smooth back to the card to write on.


Make up your mats and layers and adhere to the relevant sections then just enjoy decorating your card how you wish.

I made two of the card front mats and layers so that I could also decorate the inside front panel, the Hunkydory card I used worked nicely like that, but it is entirely up to you how many panels you decorate, my card is now quite thick so will need either a larger envelope or a box for delivery. 


I also used foam pads to raise the front tag, the inside topper and the birthday wishes sentiment.

Hope you like this card and have fun making it your own xx

Best Wishes

Julie


Wednesday 4 August 2021

Easel cards


EASEL CARDS


There are lots of different kinds of easel cards so I’m going to share a few which I hope will inspire you to give some a try!


I find the easiest easel card to make is from a square card blank and all you do is find the halfway point on the front of the card and score from top to bottom. Then fold it in on itself, turn it to face you and you have the basic shape. You can then cut another card blank in half and decorate the front and stick it on like I have done with the above wedding card or you can decorate the bottom half and add a topper. 

You will need to place a ‘stopper’ on the base of the card so it will stand up but this can be done by slightly raising a sentiment, flower or gems - anything you like!


A twisted Easel is very similar but instead of scoring top to bottom, you score along the diagonal – take care to score the right diagonal so it still opens up like a card would, you should score top right to bottom left. This can be decorated using half a card blank or a circular shape or something similar. Place a stopper on the bottom part of the card wherever you feel it sits best.


The next one I have made is a double twisted easel. I’ve used a DL card blank for this one. The first thing to do is find the halfway point and this time cut down to the fold in the card. You then have 2 sides which you score on the diagonals from the centre out to the sides so you have an open front card.


You could also do a ‘normal’ easel by scoring in half along the centre or half and half with a twist at one side.


https://youtu.be/48Qx3Y-1sHg


 I hope you will give one of these styles a try and share your make to Creative Minds Kind Hearts on Facebook.

Thanks for looking.

Gail x


#weeklypromptfloraandfauna   You will need… Cardstock Tape/glue Patterned paper Complimentary dies/die cuts. Make your card with me … Cut yo...