Tuesday 21 September 2021

Nellie Melon - Double Reverse Shutter Card

Welcome to this weeks Wednesday Wonder, which is a Double Reverse Shutter card


You will need a 12" x 6" piece of cardstock

Scoring

At 2", 4", 8" and 10" score the full height of the card 

At 1", 5", 7" and 11" score to 1 inch down from the top and 1 inch up from the bottom

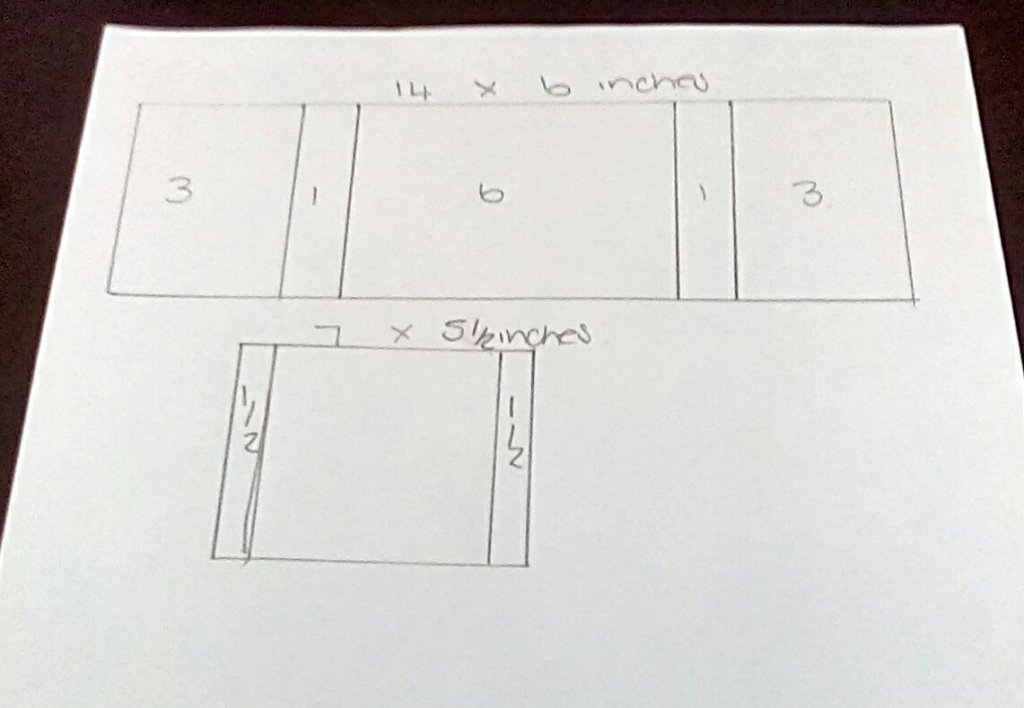
your score lines should be in these positions


Cutting 

Make a straight cut from the black spot to the pink spot in the four places shown in the picture

Folding 

The easiest way I found to put in the folds was to start with the scores which run from top to bottom, initially ignoring the the smaller scores which will be folded the wrong way at this stage.  Hopefully your card should look something like the picture below

Now fold in the smaller score lines along the top and bottom, reversing the two on each side which were folded the wrong way on the previous step


The fun part of decorating your card now begins!  On my sample card I have added a belly band to keep it closed but that was more because I used thick cardstock

For an alternative take on the style I also made a card using a piece cut to 10" x 6" but only put the fold and cuts on one side, when folded this will fit in a 6" x 6" envelope


Hope you enjoy trying out this style and be sure to share your cards on the main page


Have fun!

Nellie Melon

Tuesday 14 September 2021

Cathryn Walker - Trifold Tags

As you may know I do love a good tag so today have done a little fold out tag tutorial for you, perfect for gift cards, little notes or an alternative to a card.  


My folded tags measure 3"x6" but you can adapt this to make tags as small or large as you like.  I cut a 9 3/8" x 6" sheet of card then scored along the longest edge at 3", 3 2/8", 6 2/8" and 6 3/8".


To cut the tag shape I marked 1/2" in and 1/2" down from each top corner then cut between these to remove the corners. 

I then used a chestnut brown ink around the tags front and back to give it a more vintage look. 


I then cut patterned paper from my vintage dreams paperpad into 5 tags measuring 2 3/4" x 5 3/4", 3 Small tags measuring 1 1/2" x 2 3/4" and a 1 1/2" x 6" strip of paper. 


I used 2 of the large tags to decorate the inside of the folded tag.  For the strip I layed out the small tags against the back of the paper and marked between the tags before gluing along the marked lines and sticking into the middle inside tag to make 3 slots for the little tags. 


I attached a ribbon to tie my tag so I glued this into place then secured with double sided tape before decorating the front and back covers with the other large tags. 


I also cut out two 2"x 2 3/4" rectangles then cut these diagonally to make little pockets for the inside of my tags.  I attached these by gluing along the horizontal and vertical sides and leaving the diagonal side unglued to create a "pocket" that you can use for little notes or more tags. 


Look forward to seeing all your crafty makes 😊


Tuesday 7 September 2021

Two tents are better than one


Two tents are better than one!


I love easy designs that still have impact and I turn to this style time and time again. I like how it has plenty of room to write personal message inside.

You will need:

  • card blank 5 ¾ x 5 ¾ (14.5cm) or cut one from A4 card (bought as card blank)

  •  card blank 4 x 4 or cut one to 4 ¼ x 4 ¼ from card (see notes below) (10cm or 10.5cm)

  •  topper at least 4” square or diameter (10cm)
  •  scraps of design paper and contrasting paper to mat


This design works well for circular or square toppers but start with the one you want you use. Today I have a square topper cut from 12 x 12 sheet of Sandy paws papers designed by Helz Cuppelditch for Craft Consortium. This will fit exactly onto a premade 4” card blank or I could trim it and mat with the same contrasting paper onto a 4 ¼ “, which I decided to do.

To cut aperture:

If you have a square die 3 3/8 or 8.5cm cut this centrally into the card front, or use a scalpel or trimmer leaving a 1 1/8 or 3cm frame outside. Tip- this is exactly the width of my metal ruler. 


Cut strips of contrasting paper for mat layer 1” wide or 2.5 cm. I like a pinwheel effect similar to patchwork and cut them 4 1/2“ long (approx. 11.2 cm).

Check each side to ensure they fit and trim if necessary, before adhering, especially if you have die-cut the aperture.


Mat (and layer) the topper onto smaller card base ensuring it is tent fold. Place this centrally inside main card, lifting and checking all correct before adding glue. I use Collall wet glue here and don’t press down, lifting outer card to check it is straight from inside too. If desired, you can add stamps to inside of card too.

Voilà!


Happy Crafting!  

Lesley


#weeklypromptfloraandfauna   You will need… Cardstock Tape/glue Patterned paper Complimentary dies/die cuts. Make your card with me … Cut yo...