Wednesday 29 June 2022

#46 DOUBLE TAG BOOK FOLD BY ANGELA STINCHCOMBE


WW Summer of Folds No. 46: Double tag book fold


Hello again,


To make this card you will need the following (all measurements are in inches):


Base layer (x1)

5 ½  x 11 ¼

Matts (x4)*

Patterned paper (x4)*

5 ¼ x 5 ¼ 

5 x 5

Front strip (x1)

2 ½  x 11 ¼

Matts (x4)

Patterned paper (x4)

2 ½ x 2 ¼ 

2 ¼ x 2

Pocket (x1)

5 x 5

Cut in half diagonally


Spine (x1)

5 ¼ x ¼


Tags (x2) & ribbon


*If using the patterned card for cover (as in the example) you will only need 2 matts & 2 patterned paper for the internal faces.


The base & front strip can be cut from a single A4 sheet. I have used Hunkydory Adorable Scorable® “Hedgehog Hugs”. The finished card measures 5 ½ x 5 ½  and fits a standard 6 x 6 envelope, however, it will need to be weighed at the Post Office as it does not fit through the size guide to go as standard mail.


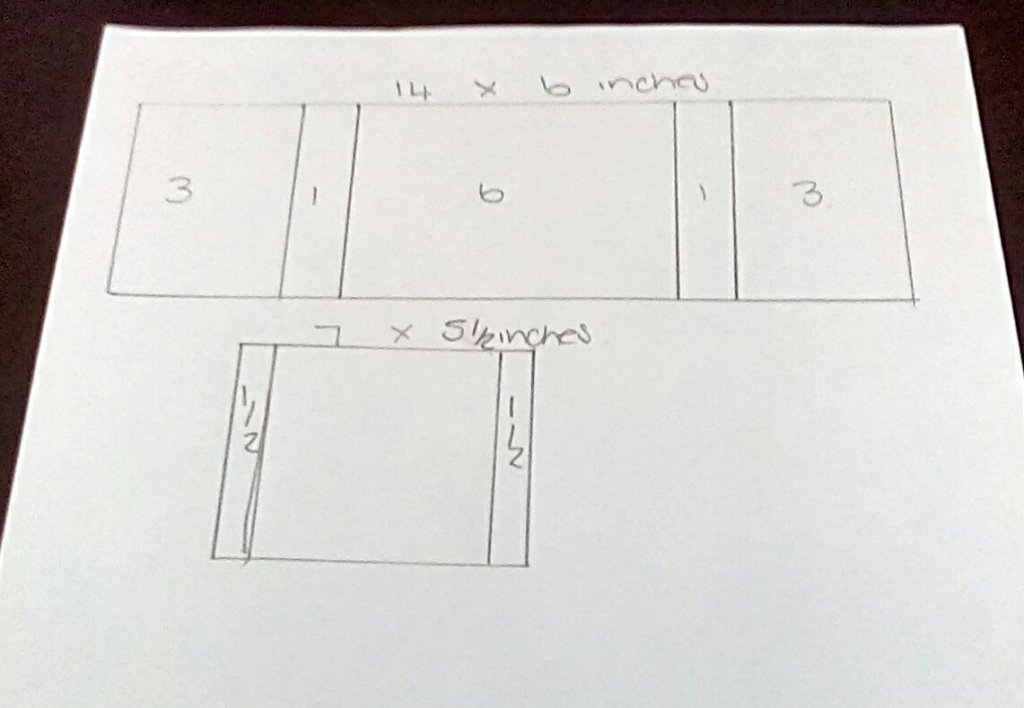
Pattern for sizes & folds


Step 1: Base

Create the base layer by scoring at 5 ½ & 5 ¾ on the long edge (this creates the spine) – both are valley folds. Burnish well. Add matts & paper of choice, including the internal spine.


Step 2: Front strip

Create the front strip by scoring every 2 ¾ on the long edge creating 4 identical areas – fold valley/mountain/valley for concertina effect (see photo above). Burnish well. Add matts & decorate


 Matts/decorations in place.


Step 3: Pockets & tags

Add pockets to the base as shown below by only taping the 2 straight edges.

Create tags of an appropriate size to fit the pockets.

Attach the front strip to the base by taping only the 1st and last panels to the base card, ensuring all edges line up (to give you wriggle time add wet glue to your tape before placing).


Step 4: Decorate the front &/or back as appropriate. The finished card should look like the pictures below


front cover


                                                                     View from above (minus tags)


Angela Stinchcombe 

27/05/22


Tuesday 21 June 2022

Beautiful Fan Fold card WW #45 by Tracy Shephard

 Hello everyone.

A lot of you lovely ladies were kind with your comments about my Fan Fold card, so my very first Wednesday Wonder is to show you how I did it. 


You will need..

2 x a4 card in contrasting colours. (You can use patterned DSP for the fan if you wish.)

red liner tape

glue

pegs(to hold fan fold while it dries)

a piece of cotton thread.

decorative flower dies

sentiment stamp


1. Mark your a4 card 4 inches on one side. Cut diagonally from the opposite corner to the top of the 4 inch mark.


2.Score your 'fan' card every 1/4 inch and on the long side of your 'barrel' card, score 1/4 inch.


3. Fold your 'fan' concertina and fold the 'barrel' away from you to the back. you do not want to see the fold from the front of the card. 

There will be an extra piece to your fan that will need to be cut away. This is so all the concertina folds are away from the front of the card and looks neat. 


Using your thread, fold your fan and tie the thread about 1 inch up from the bottom.


Put two small pieces of red liner tape at the bottom of the fan and then carefully bring the two edges together to make a neat fold. 


Press these two edges together and ensure your fold does not gape. (see how all the folds are away from you?)


4. Next.. using your bone folder or a ruler, carefully shape the card for the 'barrel. It needs to be round so this will help you to bend the card into a circle.


On the short side of your card, place a few pieces of red liner tape about 1 inch in..

This is where the most pressure will be, so it needs to hold. You can use glue..but use pegs to hold the shape until the glue has dried. The bottom edges of the barrel need to be flat together. This is quite tricky I found, so take your time to ensure a neat finish. 


See how the score line is facing away from you?


See how the circle matches all the way around? If this is not perfect your card will tend to fall over..


On the score edge, place two pieces of red liner tape.For this part I also used some collal glue. This is where your fan will be. 

5. Place your fan to the barrel making sure the edges are perfectly aligned.. As I also used collal glue, I held this in place using clips until it dried. Ensure there are no gaps between the fan and the barrel. Again this can be tricky so take your time. 


Once the glue had dried, you are ready to decorate your card. 


 6. Notice on my card, the placement of my sentiment. Your card may be a little top heavy with the decoration and tend to topple over. The placement of your sentiment will help balance your card. I used some foam pads to stick the sentiment to the card. 

7. If you wish you can also line the inside of your barrel with pretty design papers to give it a completely different look. 


I hope you have a go and make this card. It is a stunning card and I cannot wait to see all your beautiful designs.

Happy crafting x 


Wednesday 8 June 2022

#43 WW Triple Folio Card by Julie Walker

Hi Everyone, Julie here, this is my card for this week's fold inspiration. I was looking at Youtube for inspiration when I came across an Erin Reed video, there were actually five card styles on the video, all very nice, but I really liked this one so gave it a try and hope you will too. You will need a Base card measuring 11.5 inches by 5.5 inches. [29.5cm by 14cm] A separate piece of base card measuring 4.25 inches by 2.75 inches. [11cm by 7cm] 
Method

Score the long piece of card at .25 inches, 3.75 inches and 7.25 inches. [.5cm, 9.5cm and 18.5cm]. Place the card so the .25 inch fold is at the bottom and mark a line 5/8th of an inch from the top of the card [the left-hand side as you look at the card] to the 7.25-inch line. Cut this section of the card off. Burnish all your folds. Add adhesive to the .25 inch flap, I used red liner tape for ease but I am sure wet glue would work just as well. Add the 4.25 by 2.75 inch piece of card vertically to the flap, securing from the bottom upwards, and snip the little tab left at the top of the flap to neaten your card.
For the mats and layers, I just adjusted the measurements for each section by .25 and .50 inches and I decorated all four sections.

I look forward to seeing your cards. Thank you to Erin Reed for her video and inspiration and happy crafting everyone.

Love Julie 

Wednesday 1 June 2022

#42 WW Triple Easel Card by Angela Stinchcombe


Triple Easel Card by Angela Stinchcombe


Hello everyone.  This is my first blog post for Creative Minds Kind Hearts and I have a beautiful card design to share with you. 


To make the 3 easels you will need the following (all sizes in inches):


Base layer

Easel panel

Matts (x2)

Patterned paper (x2)

Large easel

11x5.5

Score at 2.75 & 5.5

 on the long edge

5.5x5.5

5.25x5.25

5x5

Medium easel

9x4.5

Score at 2.25 & 4.5 

on the long edge

4.5x4.5

4.25x4.25

4x4

Small easel

7x3.5

Score at 1.75 & 3.5

on the long edge

3.5x3.5

3.25x3.25

3x3


You will also need a raised ‘stop’ for the small easel plus decorations for each easel layer.


Finished size is 5.5x7.5 so fits a standard 6x8.5 inch envelope.


·      Fold & burnish all folds as mountains. 

·      Glue the bottom half of the easel panel to your base layer front section (use wet glue on the folded face only), lining up the front edges carefully

·      Glue each matt, then patterned layer in place (1 matt & patterned piece sits on the easel ‘face’, the other on the base) [


·      Glue the medium easel onto the largest easel centrally so that the front sits 1” forward – easiest done with the easel open.  You may prefer to use red tape here.


·      Glue the small easel 1” forward of the medium easel in the same way


·      Decorate your layers so that it all folds flat for posting (to fold lay the small easel flat, lay the medium easel over the top, then the large over the medium) 


The same instructions can be used for circles or hearts but if die-cutting the shapes remember to place the die over the crease for your base layers to leave a hinge, then cover with the easel panel.


For a different look try placing the square easels off to one side so not so regimented, or use mirror card for matts…….


I would love to see your versions of this Triple Easel card so please share your makes on the Creative Minds Kind Hearts Facebook Group.


Love 

Angela 

#weeklypromptfloraandfauna   You will need… Cardstock Tape/glue Patterned paper Complimentary dies/die cuts. Make your card with me … Cut yo...