It's also a great way to use up those leftover off-cuts of card that we all save too.
The crate can also be made with white card or a wood grained patterned card or even a card that you can stamp or emboss a wood grain effect on. It's up to you what you choose to use.
If you are using white card, then why not try using a grey distress or other die based ink as this will give a lovely weathered wood look. Try using Hickory Smoke or Weathered Wood if you have them.
Step 1 Assemble your supplies
To make a Kraft card style crate you will need the following supplies for :
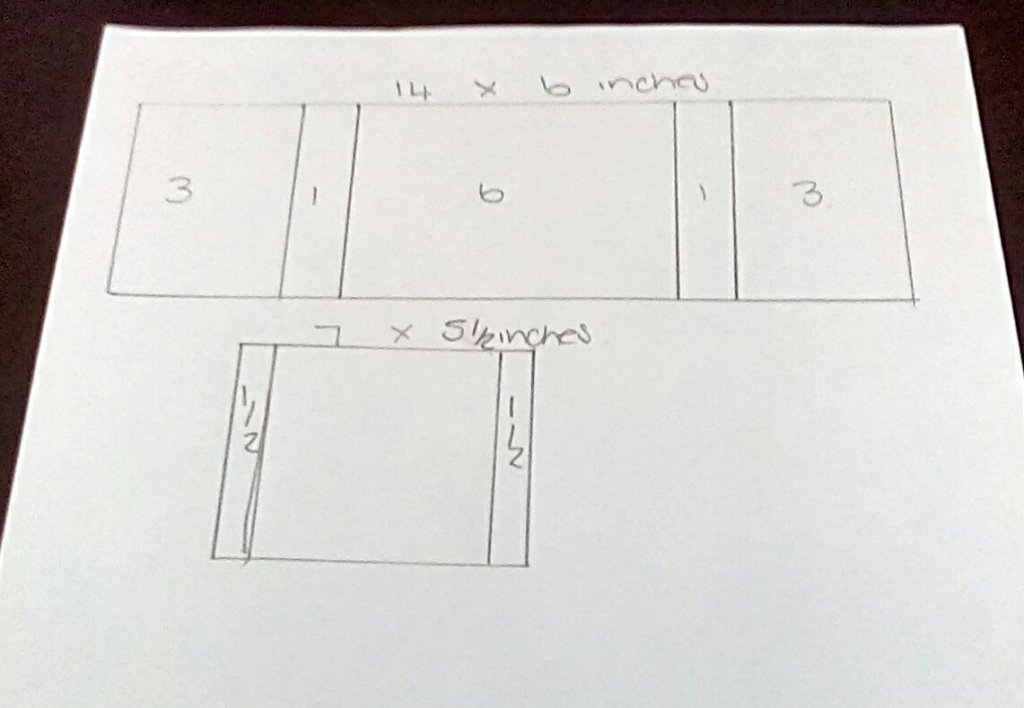
- 1 piece of 3 1/2 " x 3" Kraft card stock - Piece A
- 1 piece of 4" x 2" Kraft card stock - Piece B
- 1 piece of 3" x 1 3/4" Kraft card stock - Piece C
- 1 piece of 2" x 2" Kraft card stock - Piece D
- Distress ink: Ground Espresso
- Glue ( easier to use than double sided tape )
- Selection of die cut flowers and leaves
- Sentiment
To decorate my crate of flowers I have used the following:
- Lisa Horton Craft dies
- - Large Foliage, Shabby Florals, Slimline Multi Envelope, Nested Torn Edge Circles
- Sequins
- Distress Inks - Twisted Citron and Wilted Violet
- Promarker - Ruby
- Sakura Gelly Roll pen - white
- Stabilo Fine liner pen - yellow
- Posca Pen - white
Step 2 Add wood grain effect to card pieces
Once you have measured and cut out all the pieces of card we are going to use an ink pad to create a wood grain effect. Simply drag the ink pad over the piece of card in a single direction from one side to the opposite side.
If you slightly angle the ink pad as you drag it over the card you can create lines that look like planks of wood. To get a good coverage of ink rotate the entire piece of card through 180 degrees and repeat the process, dragging the ink pad across the piece of card.
Here are my finished wood grain pieces.
Step 3 Cutting the planks of wood
When you are happy with the look of your pieces of card we then need to cut these to the sizes of the planks of wood that will form our crate.
Piece A - cut along the 3" side at 1/2" intervals, you will have 6 planks that are 3 1/2" x 1/2"
Piece B - cut along the 2" side at 1/2" intervals, you will have 4 planks that are 4" x 1/2"
Piece C - cut along the 3" side at 1/2" intervals, you will have 6 planks that are 1 3/4" x 1/2"
Piece D - cut along the 2" side 1/2" intervals, you will have 6 planks that are 2" x 1/2"
Planks A will form the front and back of the crate
Planks B will be the supports inside the crate that flowers and leaves can be adhered to
Planks C will form the crate sides
Planks D will be the corners of the crate
At this stage you can add a little more ink to your planks if required - I like to add a little more ink to the edges of the planks for more definition.
Step 4 - Create the corners
Take the 4 corner planks (D) and score each of these along the 1/2" side at 1/4 " burnish each piece to make a sharp corner
Step 5 - Assemble the front and back of the crate
Take the first corner piece (D) and 1 of the planks (A) and add a small amount of glue to the plank and then adhere this to the inside of the corner so that the top of the plank and top of the corner are flush as shown here in the photo below.
Take a second plank, add glue and adhere to the inside of the bottom of the corner piece
and finally take the third plank add glue again and adhere this in between the top and bottom planks. This process is basically repeated for the whole crate.
Remember that your inky or decorative sides needs to be on the outside of the crate !Take a second corner piece and add glue to each of the three planks and adhere this to the inside of the second corner
Repeat these steps to create the back of your crate. You will now have two completed panels.
Step 6 - Assemble the two sides of the crate
Next we will add the side planks.
Take one of the side planks (C) and the completed front panel.....add a little glue to one of the planks and adhere this to the inside top of the corner. Repeat this for the bottom side plank and then the middle side plank.
Try to make sure that the side planks are as square to the front panel planks as possible - you can do this by folding the side panel towards the front panel and adjusting whilst the glue is still wet.
Repeat these steps adding the remaining 3 side planks, you now have the front panel with two attached sides as in the photo below.
Step 7 - Attach the back panel of the crate
Finally we are going to take the back panel and attach this first to one side, in exactly the same way...applying glue to the 3 of the side planks.
NB You will find it easier to attach one side at a time.
Next apply glue to the remaining three side planks and adhere to the back panel. This will complete the body of the crate.
The crate should fold flat in both directions and the front, back and side planks should all line up neatly.
Step 8 - attach inner supports.
Once the crate body is finished put this to one side to allow the glue to dry properly while we prepare the inner supports.
Next take the inner support planks (B), these are the remaining four planks which measure 4" x 1/2".
You will need to score each plank at 1/4" at each end of the plank to make small tabs.
Once the supports are scored they can be attached inside the crate.
Take one support and add glue to the small tabs that you have created, then adhere this inside the crate, at the top as shown in the photo below. You will find it easier to glue one tab first and then repeat for the second tab.
At this point the crate should still fold flat - it will most likely fold flat easier in one direction than the other, but with a little manipulation, folding the crate flat in one direction and then the next should resolve this.
I like to add my support planks evenly spaced so starting at the rear of the crate first, then add the front support and finally adding in the final two supports, this will give you a good even spacing. Each time you add a support remember to fold the crate flat in both directions.
Adhere the remaining 3 inner supports to the crate.
Step 9 - Decorate the crate
Once the crate is completed, put it to one side again to allow the glue to fully dry whilst you assemble your flowers, leaves and sentiment.
Its entirely up to you what you use and how much - I have chosen to make some flowers using my Lisa Horton Crafts, flower and and leaf dies and scraps of different card that I have in my stash.
If you don't have any flower dies then you could use pre-cut flowers and leaves or maybe stamp flowers and then fussy cut them if you prefer. Depending on the weight of the card stock that you use for the flower stems, you may want to double up the stems so the flowers will stand up.Once you have all the flowers and leaves for your crate you can then add them to the internal supports...gluing each flower at different heights to fill the space. There are no rules at all but you want to make the crate look like full display of flowers.
I like to start at the front of the crate and work back, adding flowers to each support and then fill in the gaps with the leaves. You can adhere the stems of the flowers to the front or the back of the supports - its entirely up to you !
This small flower crate when folded flat will fit comfortably in a 6 x 6 envelop, I use this underneath my design to make sure that my flowers and leaves do not protrude outside this area, but if you want to add more height and width, just use a bigger envelope or even make a box for the finished crate.
So there are the instructions - I hope that you will have a go making one of these crates of flowers.
I usually add a small die cut label on the reverse of the crate so that you can write a personal message.
Have fun and don't forget to share your flower crates in the Creative Minds Kind Hearts Facebook group !
If you are not already a member and love to make cards then why not join us - here is a link to the group.
https://www.facebook.com/groups/2483942875168158/
Wendy xx