LISA SHAW - IMPOSSIBLE CARD

Here is the template for the card that Lisa made during her Facebook Live.

You can see full instructions on our YouTube Channel.
https://youtu.be/et6EJ96Qzqo

LISA SHAW - IMPOSSIBLE CARD
Here is the template for the card that Lisa made during her Facebook Live.
You can see full instructions on our YouTube Channel.
https://youtu.be/et6EJ96Qzqo

Here are the paper strip measurements that you will need to make this pumpkin.
I used 2 12x12 papers
2 x 1 1/2" by 12" (A)
4 x 1 3/4" x12". (B)
4 x 2 1/4" x 12". (C)
2 x 2 3/4"x 12". (D)
Remember to score the papers before cutting the strips and to complete one task at a time.
Wet glue is ok but hot glue is better. Make sure you leave enough time for it to dry.
To create the pumpkin shape lay them from the base upwards in this order
B / C / D / B / A
If you need any further information - just ask :)
Happy paper pumpkin making x from Elisabeth x
https://youtu.be/-RANvrgAaGA
MOIRA YAKOVA - HEXAGONAL CRACKER GIFT BOX

HEXAGONAL CRACKER GIFT BOX
To
make this you will need:
One
A4 sheet of card 250 or 300 gsm
Patterned
paper for mats
Embellishments
of choice
Cut
the card to 29 cm long. Score along the short side at 3cm, 4.5cm and 6cm
(For metric cut to 11 1/4" and score at 1 1/4", 1 3/4" and 2 1/4")
Rotate
the card and score the other side using the same measurements
Score
along the short side at 4.5, 9, 13.5, 18, 22.5 and 27cm
(For metric score at 1 3/4", 3 1/2", 5 1/4", 7", 8 3/4" and 10 1/2")
On
the 4.5 score line measure in 1 cm and leave a tiny pencil mark.
(for metric measure 1/2")
Measure
1 cm on either side of each score line on the long side and leave a pencil mark
Do
this on both sides of the cracker. See diagram below:

Fold
along each score line on the long side of the card, and cut from the corner of
the fold line to the
pencil
mark on both sides and cut.


Cut
away the marked pieces as shown in the diagram to form a tab.

Concertina fold and
burnish the score lines on the short edge to form the top and bottom edges of
the cracker.

At
this point I prefer to do my mats and layers while the project can be laid out
flat.
For
this size of cracker I used the following paper sizes for the mats :
For
the six large panels , which measure 9cm x 4.5 cm, I cut
6
pieces of paper measuring 8.8 cm x 4.3 cm
(for metric 3 3/4" x 1 5/8")
For
the top and bottom edges of the cracker, which measure 3cm x 4.5 cm I cut
24
pieces of paper measuring 2.8 cm x 4.3 cm, twelve for the outside edge top and
bottom, and
twelve
for this inside edges.
(for metric 1 1/8" x 1 5/8")
These
sizes leave a very narrow white border on the panels, but this is, of course, a
personal choice.

Now
you can fold the cracker into shape and stick the tabs.
The
final finishing touch is to cut to hexagonal pieces of card to close over the
two ends.
If
you don’t have hexagon dies, then all you have to do is stand the cracker
upright and draw around
the
bottom of it. If you cut just inside the
pencil line this will give a good fit, but you can trim them easily to fit.
I made this particular cracker to gift two pairs of hand knitted baby booties to a neighbour who has just had ababy girl. I always think that a pretty box can make a little gift look a lot more attractive.
LARGE HEXAGONAL CRACKER GIFT BOX
The
measurements for the larger box are as follows :
One
piece of card measuring 24 x 41 cm (you will need A3 card for this)
Score
the sheet of card along the short side at 3cm, 4.5cm and 6cm
Rotate
the card and score the other side using the same measurements
Score
along the short side at 6.5, 13, 19.5, 26, 32.5 and 39 cm
On
the 4.5 score line measure in 1.5 cms and leave a tiny pencil mark
Measure
1.5 cm on either side of each score line on the long side and leave a pencil mark
Do
this on both sides of the cracker.
Follow
the directions for the small cracker to complete
Happy crafting from Moira


INGREDIENTS
1 X A4 sheet of card
High Tack tape or strong glue
Die cut letters or stickers
Papers of your choice
Paper trimmer and Scoreboard
METHOD
·
Take the A4 card and cut 2 x 3 1\2” wide
strips
·
Take the first strip and score at 3 1\2”, 7”
and 10 1\2”
·
Cut the second strip to 7” and score at 3 1\2”
·
Burnish and fold the scorelines, alternating
between a mountain and valley fold
·
Take the first strip and put tape or strong
glue onto the smaller flap and join the 2 strips together. Your card base
should fold into a 3 1\2” square
·
To decorate, mat and layer patterned paper and
stick onto your squares
·
Cut out 1 1\2” squares of card to stick your
letters onto – I used 1” letters. Stick them in the middle of your square any
way you like. You don’t have to use squares – any shape will work
·
Cut your letters or take your stickers and
stick them into the middle of the shape.
·
You can add the rest of your sentiment to the
bottom right of the last square – either stamp it on a piece of card or if you
have a die cut that fits stick it down
·
You can embellish the front with anything you
like but its best to have flatter embelishments on the inside to help it fold
flat. I’ve used Candi and gems
Variations – You could do Merry
(Christmas), Happy (Birthday, Christmas, Easter, Anniversary), Hello (Friend)
You can do a name and if it’s longer than 5 letters just cut more strips and
join as required.
Thanks for looking! Don’t forget to share your creations on Creative Minds Kind Hearts
GAIL MANDS - STAR BOOK CARD

CRAFT SUPPLIES
3 nesting rectangles (I used Spellbinders Nestabilities scalloped)
A4 card – 3 sheets of one colour and 1 sheet a contrasting colour
Ribbon – approx. 48cm
Papers to decorate
High tack tape (red) or strong glue

HOW TO MAKE:


THANKS FOR LOOKING! DON’T FORGET TO SHARE YOUR CREATIONS ON CREATIVE MINDS KIND HEARTS FB PAGE
Happy crafting from Gail
https://youtu.be/ZgQ0JyXF1Cs

LISA SHAW - 3D POP UP CUBE CARD
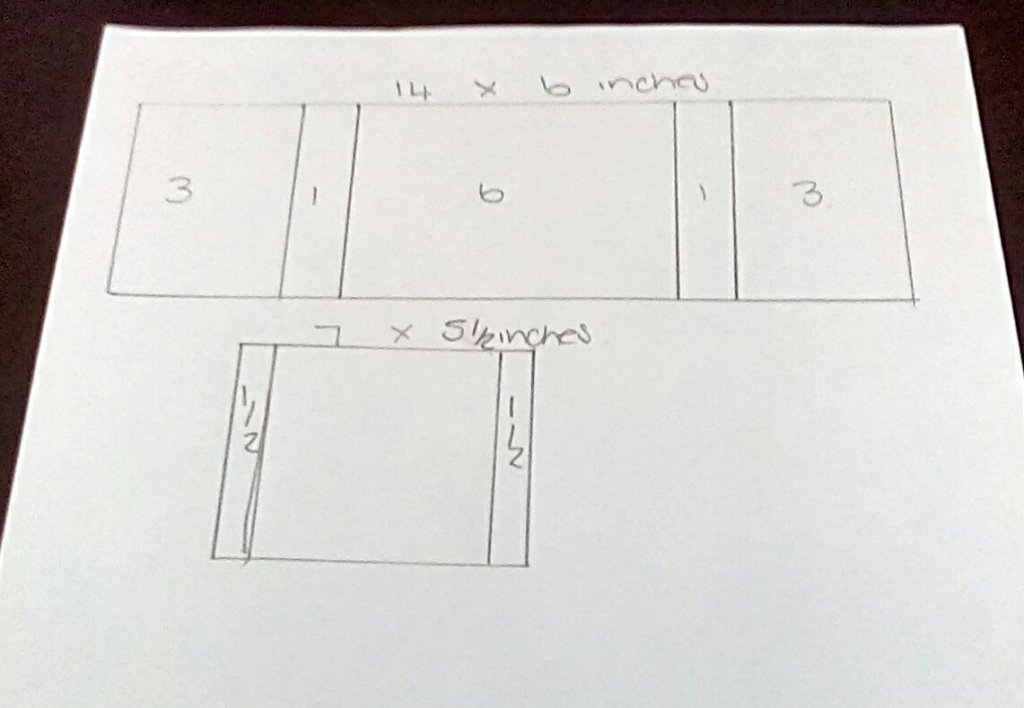
1. Cut 3 lengthwise strips from two sheets of A4 card stock.
1 x 14 cm wide
2 x 7cm wide
2 Score each strip along the length at 7cm/ 14cm/21cm/28cm. Fold and burnish each fold and cut the end flap at an angle for easy fixing.
3. Create your decorative panels and mat and layer them prior to gluing the strips into a cube. Position the flaps where they will not be seen. Remember to decorate visible insides and the bottom of the squares which will be seen when the card is folded up.
4 To make the floating sentiment. Cut two small strips of card and fold in half. Attach hinges to sentiment topper with the folds meeting. in the middle of the back of the sentiment.
5. Glue one side of the hinge to the inside of the back of the cube. Then line up and glue to the other cube in the mirrored position.
6. I put paper on my "hinge" to match the paper on the inside of the small cube. YOu can then add the toppers to decorate.
7. This card does fold flat for posting.
Follow the link to watch my video on World Card Making Day
https://youtu.be/69mFMQTe7vw
Happy Crafting from Lisa

The Group Designers and I have been very busy putting together a range of activities, recording video tutorials and writing blog posts.
Here are some of things that will be happening today. I hope you will join in and make some of the projects too. Remember to share your makes on the main Facebook Page so that we can all see.
9.15am Elisabeth Hogarth - Welcome and 3 Kings Card
10.15am Lisa Shaw - 3D Pop Up Cube Card
11.15am Gail Mands - Star Book Card
12.15pm Bernadette Taylor - Halloween Character Card
1.15pm Lesley Kilby - Jacob's Ladder
2.15pm Karen Watling - Hexagonal Pop Up Box Card
3.15pm Gail Mands - Concertina Card
4.15pm Moira Yakova - Hexagonal Cracker Gift Box
5.15pm Bernadette Taylor - Halloween Mini Album
6.15pm Wendy Jackson - Millefiori Vase in Autumn Sparkle
7.15pm Elisabeth Hogarth - Paper Pumpkin and Finale

#weeklypromptfloraandfauna You will need… Cardstock Tape/glue Patterned paper Complimentary dies/die cuts. Make your card with me … Cut yo...