Three Panel Pop out card.
Instructions given for a 6 inch card. See end for 5'' inch and 5 x 7'' variations.
Take a piece of 12 x 12
inch cardstock – I used 250 gsm card.
Score on one 12 inch side at 4 and 8 inches. Turn card
90 degrees and cut to a 12 x 6 inch piece. On this piece Fold .. from left side
first score is mountain. Right score valley .
Decide how deep you want the ‘pop out’ panel to be.
Mine is 4''. So cut remaining strip at 4 x 12 Again mountain and valley folds to
match bigger piece.
Tip: Alternatively
cut the 12 x 12 cardstock to 12 x 10 then score – that way you have a piece of 2
x 12 unscored- I usually add this to my white bits box and use for stamping.
Mat and layer the larger piece panels. I left 1/8 inch
all round.
Mat and layer the ‘pop out’ panel , again with a 1/8'' border all round. Make up topper
decorations but it’s easier to leave off any ‘topper’ decorations until you
have assembled the card as required.
Tip: You could emboss part or all of these sections of the pop out.
The back panel of the
card is ideal for your sentiment, greeting words etc. If you will use the card straightaway
it might be easier to add this panel with a sentiment now.
To add the ‘pop out’ panel. Start by getting the envelope you are going to use for the card - the idea is that the ‘pop out’ doesn't want to overhang the card to the extent it won’t fit in the envelope.
Lay the tall three-fold tall panel to the left of the
envelope, leaving a slight gap from the edge.
Place the front section of the pop out front panel on
top of the front fold of the main card piece i.e. tuck the other two parts under
the front panel.
It is entirely up to you where it sits,
but be careful not to put it too low or high as it could cause the card to be unbalanced and not stand up.
Tip: use wet glue that way it gives you
some ‘wriggle’ room. I use Collall Multi-purpose glue.
Glue this front panel down, taking care not to place glue on the part that ‘overhangs’ the card.
Turn the card over carefully face down and glue the back panel, this one is much easier to do than the front. Glue as in the photo then fold the back part of the card over. Check its sitting straight, wriggle slightly as required.
Decorate and add toppers as required. I have used CWC 'Sew Lovely' papers and Candi - Very Merry Gold. The decorative toppers are also CWC. Backing paper Papermania. Rear sentiment is Stampin Up!
Variations
on card sizes.
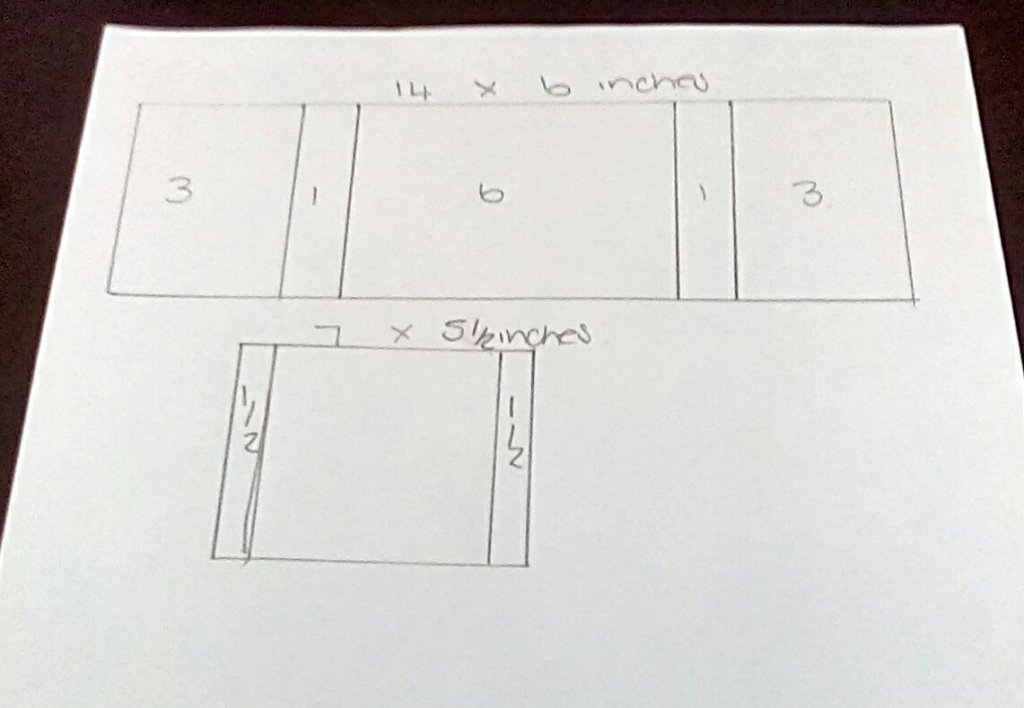
Using 12 x 12 card stock I have also made a 5 x 7 version where the card was scored the same at 4 and 8 inch then cut to 7 x 12. Cut the remaining strip at 4 1/4. x 12 Again mountain and valley folds to match bigger piece. Mat and layer. 1/8 inch decrease all round. This card features just one shade of blue and to add texture and definition all panels are embossed.
Score along the long side at 3 ¾ , 7 ½ inches.
Cut on short side at 5 inches. This will give you two
pieces 11 ¼ wide x 5 inches and 11 ¼ x 3 ¼ inches. Cut the mats and layers with
a 1/8 inch border all round. All supplies - 'Highland Collection' from a magazine freebie.
This card design can also be up-scaled using A3
cardstock and the shape changed too following the same basic thirds principal.
Enjoy 😊
;Gill x


Great model Yvonne, I love your used papers also.
ReplyDeleteHugs, Wilma x
Thank you Wilma xx
DeleteGorgeous card and great instructions. Thanks for the inspiration Gill xx
ReplyDeleteThank you for reading the blog. I look forward to seeing your card xx
DeleteFabulous tutorial Gill x
ReplyDeleteThanks so much Heather, so kind of you xx
DeleteBeautiful cards and great instructions, thanks Gill x
ReplyDeleteThank you so much. Have fun trying out the design x
DeleteGreat card and instructions Gill , thank you xx
ReplyDeleteThank you so much Yvonne xx
ReplyDelete