Friday, 30 September 2022

HAPPY WORLD CARD MAKING DAY 2022 and ROUND UP OF SEPTEMBER 2022.


Hello everyone

Happy World Card Making Day to you all.  What projects will you be working on, or will you be treating yourself to some new crafting items?  Whatever you decide - raise a glass and acknowledge this great hobby that brings us all together.

I have become increasingly frustrated by the limits placed on me in maintaining our Facebook Group.  I still haven't made sense of the notification settings. Therefore, I thought I would try writing an extensive blog post to you all so that I can share your September creations, and some new ideas for October and celebrate some magnificent achievements with you too.


One Sheet Wonder

Thank you to our Group Experts for all their efforts over the past few weeks.  I was very impressed with the results achieved by Gail Mands, Caroline Pattenden and Liz Cavill using the One Sheet Wonder Challenge.  I love the variety of these designs and how the ladies added their own style to the design.  I hope these cards will inspire you with your future makes.  It is really amazing to see how many cards can be made from one sheet of 12x12 paper.


October Challenge - Word prompts

October sees the start of a new word prompt challenge ( which is featured in the CMKH planner)  You will find a copy of the list below.  As always you can set yourself a target to complete any number of days or you could just concentrate on stamping cards or making all your Halloween projects with the prompts.  These challenges are great for giving your mojo a kickstart or making you think about your craft in another way.   

The words can be interpreted as you wish.  For example, on Day 15 a card could be created using brush pens or watercolour paint.  Alternatively, a picture of a "brush" could be the main focal point of your card.   I will set up a new album however I am very aware of all the problems Facebook causes with their constant updates.  The main thing is to share your work - so add it to the main discussion page and add the day you are making it for.  It makes sense to post your cards/projects on the date ie the 3rd Bewitched should be added on the 3rd of October.  


Albums

When I set up this version of Creative Minds Kind Hearts - the album system worked very well and everything was pretty easy to follow.  Through no fault of my own, Facebook has made uploading and finding albums increasingly tricky.  Don't panic if you can't find an album - simply add your photos to the main discussion page and ask one of the Group Experts to help you add them to an album.  Photos don't need to be in an album unless you want to save them for the future.  If you are sharing monthly Happy Posts then please tag Elisabeth or Gail so that we know cards have been sent/received.

If you want to have a go at finding the albums on your mobile/tablets.  Look for the three dots in the left-hand corner of the main page.  Tap on them to reveal a drop-down menu.  Albums will be one of the headers.  Tap on Albums and a whole list of various albums will appear.

On a computer - look for the menu underneath the page banner.  Then scroll across to Media.  Click on the tab and Albums will appear.

The address album is saved lower down the list.  Names are stored as Christian names rather than surnames so my name is saved under E for Elisabeth not H for Hogarth.

The birthday album is one of the last on the list.  If you would like a mention at the start of your birthday month then look for the month and tell me in the comments below the photo your birth date.

The Christmas Card - a- long is filling up nicely now.  You can join in at any time and you can also use the album as a source of inspiration.

Wednesday Wonders/ Sketches are paused due to limited interest.  If you want to find the older versions then either view them in the WW Album or look for the Ultimate Sketch Album to view the entire collection we have created.  Most of them have a link to a YouTube tutorial or a blog post.  

Poll

A few weeks ago I held a series of polls.  It is good to see how many of you enjoy visiting the group.  The main reason you seem to use it is to connect with the other members.  Many of you are talented crafters who enjoy looking for inspiration.  Creative Minds Kind Hearts can only stay fresh and interesting if its members engage and let us know what they like.  Emojis and comments on posts really help us to know what content to create so please do try to engage and share your work.

Expanding from card making to all crafts

It is wonderful to see so many crafts shared on Mixed Up Monday.  I would like to know if you would prefer to keep the group as a predominantly card-making group or would you prefer to share all of your crafts every day of the week?  Please let me know your thoughts in the comments below.

A big shout out to Miriam Lowrie, Elaine Thomson Smith and Gill Cox for all the brilliant makes and wedding decorations they shared with the group.


It has also been great seeing the really stylish cards that have been made this month.  It is heartwarming to see so many company design team members willing to share their work and their ideas with the group.  If you have questions about how these cards are made then do ask the questions because as crafters we can all share our knowledge.  Thank you for sharing Donna Cleary, Heidi Hobson, Mary Kelly and Lorraine Sanders.


Of course, you don't need to be on a company design team to share your cards.  Look at these classy numbers from Janet Roberts, Elaine Thomson Smith and Tracy Shephard.


And as always there have been some fancy folded cards created by  Karen L Williams and Lesley Chambers.


As you can see there really is something for everyone in Creative Minds Kind Hearts.


Five Year Anniversary

The group as you know it - will be celebrating its fifth anniversary in November.   During that time, I myself have worked with several craft companies including Craftwork Cards, The Hobby House, Splashcrafts, Kanban Crafts, Lisa Horton Crafts, Craft Consortium and most recently Graphic 45.  As I have evolved so has this group (of which I am very proud). This group would not work without the ladies who have committed to being Group Designers/Group Experts.  Many of them have gone on to achieve so much in their own right. 


Congratulations on your achievements.

I would like to take this opportunity to congratulate 

Lesley Kilby on joining the Craft Consortium design team and this week completing a full magazine spread in Papercraft Essentials Issue 217.


Gail Mands on setting up her own Card Design Page and celebrating its 2nd Anniversary.  Please follow the link and help Gail's page grow.  https://www.facebook.com/gail.mands.card.designs


Congratulations should also be given to Lisa Shaw who has recently joined the Nitwits Collections Design Team.  It is great to see that all the Fb Lives Lisa shared with us got her noticed and she is able to share her love of digital crafting with others.


I would also like to congratulate Heidi Hobson on achieving her dream role of becoming a Guest Designer for Oakwood Direct on Hobby Maker.  You can watch her live on Freeview Channel 73 on 1st October at 1pm.


In addition, many congratulations to Natasja Bosker upon joining the Oakwood Direct Design Team and for creating her own set of stamps with Pronty stamps.


It is really important to celebrate and applaud each other's achievements. We may be a small group but "Great oaks from little acorns grow"


CMKH Planner

During Christmas 2021 and New Year 2022, I pulled together a Crafty Planner dedicated to the members of this group.  More than 30 copies were sold.  I would love to know from those of you that bought a copy if you found it useful?  If you didn't buy a copy is it something you would like to receive this year.  If there is enough positive interest I am willing to create a 2023 planner which would be available to buy in time for Christmas 2022.


Finally...

I would love to know your thoughts on this blog post.  Did you enjoy reading a monthly round-up of September?  Is it helpful to have all the news and information in one place rather than hopping around the Features area on the group page?  Please let me know in the comments below.

Finally, I will be setting up the October Happy Post list on the 1st of October and you have until the 5th of October to sign up.  If you have friends who are interested please would you point them in the right direction because I hate it when people miss out.  

HAPPY CRAFTING
Love Elisabeth


Be Creative - Be Kind - Be You


PS Here is a little something I have been working on for Kanban Crafts.  It includes a new must-have crafting product.  I will let you know the showtimes and availability soon! 


Wednesday, 17 August 2022

#53 WW Diagonal double fold card by Julie Walker

Found a video online by Lisa Curcio of Lisa's Stamp Studio and loved it, hope you will too. looks a bit complicated but trust me it isn't
You will need to start with a piece of base card 8.5 inches by 11 inches (21.6 cm by 28 cm) Score this card at the half way point on both the vertical and horizontal, so 4.25 inches (10.8 cm) on the short side and 5.5 inches (14 cm) on the longer side.
Cut one complete quadrant from the card
The arrows in the picture indicate how to diagaonally cut two further quadrants on your card, so that you end up with a base card that looks like this
Score your folds well so that the card sits nicely. The side panel folds inwards and the top panel folds down . Now its time to decorate. A little more tricky than I at first thought but you just have to remember if your paper is directional to make sure you are cutting your angles correctly. Hope you will have a try at this card, I don't think you will be disappointed. I put mats and layers on my card and it still folds nice and flat into a standard envelope. Have fun and happy crafting everyone.

Tuesday, 9 August 2022

Wednesday Wonder #52 by Tracy Shephard

 Hello everyone.

Welcome to my second card for the 'Wednesday Wonder' challenge and I hope you love it as much as I do. 


I think it is a fabulous fold and so versatile. You can change it in so many different ways.

Of course it has to be a bit of a showstopper!

You will need..

cardstock 5 x 20 inches. I used 160gsm.
acetate   5 x 10 inches
Design paper of your choice
plain or coloured card for mat and layering

For the Rosette

cardstock 1 x 15 inches
small circle
center flower decoration

You will also need a large sentiment.

So let's get started...


1. Score your 5 x 20 cardstock along the long side at 5 and 15 inches, fold and burnish.

2. I used three mats for the inside of my card. Each one cut 1/4 inch smaller than the other.

   Pink layer 9 3/4 x 4 3/4
   White layer 9 1/2 x 4 1/2
   Design paper 9 1/4 x 4 1/4

3. For the folds on each side of your card...
I found using a lighter card, made the folding easier. You need sharp, crisp folds and a neat point.

Each flap is 5 x 5 inches. Find the center of the flap and lightly mark it. 


On each side, mark at 2 inches, and 4 1/4 inches. 
Using your scoring tool, starting at the center point, score to each side mark. 


Fold and burnish each scoreline so you get get a lovely crisp edge.

 4. For the mat and layers for the flaps, I used three layers for the triangle..

Pink layer 4 3/4 x 4 3/4

White layer 4 1/2 x 4 1/2 

Design paper 4 1/4 x 4 1/4

I cut each piece as a square, found the center point and cut to each bottom corner. 

5. The pink layers, were a bit more tricky, so take your time... 

You will need 4 of the following shape. 


You can make a template. Using copy paper, make the 5 x 5 flap and fold and cut the piece you need for the layer. This will make it much easier. 

6. Take your 5 x 20 inch acetate and place it on your card with the flaps over it. I used red liner tape to attach the flaps to the acetate. 

7. The Rosette is made by scoring the 1 x 15 inch cardstock and scoring it every 1/4 inch. Concertina fold the scorelines and tape together to make a circle, 

8. Fiddle the Rosette into a neat circle and using hot glue, stick the small cicle to the back. 

Hot glue is brilliant for this purpose, making it quick, easy and less messy. 

Stick a pretty flower to the front of the Rosette, and then , agin using hot glue, place the Rosette to the center points of the front flaps on your card. 

9. Finally, add you sentiment. I used 3D foam pads, which gave it a lift and it stands out beautifully. 


I do hope you will give this a try and I can't wait to see your gorgeous creations.

Happy crafting


Tracy x 


Wednesday, 3 August 2022

#51 WW Twist and Fold Card by Liz Cavill

Welcome to another Wednesday Wonder and this week it's a Twist and Fold card.

The butterflies are attached just by the body and antennae, leaving the wings loose.  
This is the card closed.....

..... and this shows what it is like when opened.

There are a lot of templates online for starting with a 8" x 8" piece of card, but I couldn't find any for 10" x 10", so I've made the one below.  The finished card when folded will be 5" x 5".   The larger version is less fiddly to fold.

Start with a 10" x 10" piece of card, it's best to use fairly thin card as it will be easier to fold the card flat. 
The blue and red lines are the score lines.  I found it easiest to score the four rectangles in the corners first, then score the four diagonal lines.
Red lines = Mountain folds 
Blue lines = Valley folds

Decorate the sections with mats ¼" smaller than each section.

When folded, the four corners are the parts that will show on the front of the card, so embellishments can be added on the corners. 

I've left the middle of the card blank for the message, but you could decorate this area and write the message on the back.  To close the card, make sure all your mountains and valley folds are well burnished, to enable you to easily twist and fold the card.

For my second card, I added an extra white mat and changed the shape I used of some the mats.  The flowers are attached just by the middle and the petals bent up to add some dimension.


This little video shows how the card opens and closes.  You may need to click on it twice to view.

I hope you try this fold.  Don't forget to share a photo on our CMKH Facebook page and add to the WW album.

Love Liz xx

Sunday, 31 July 2022

AUGUST "ONE SHEET" GROUP CHALLENGE

 Hello again

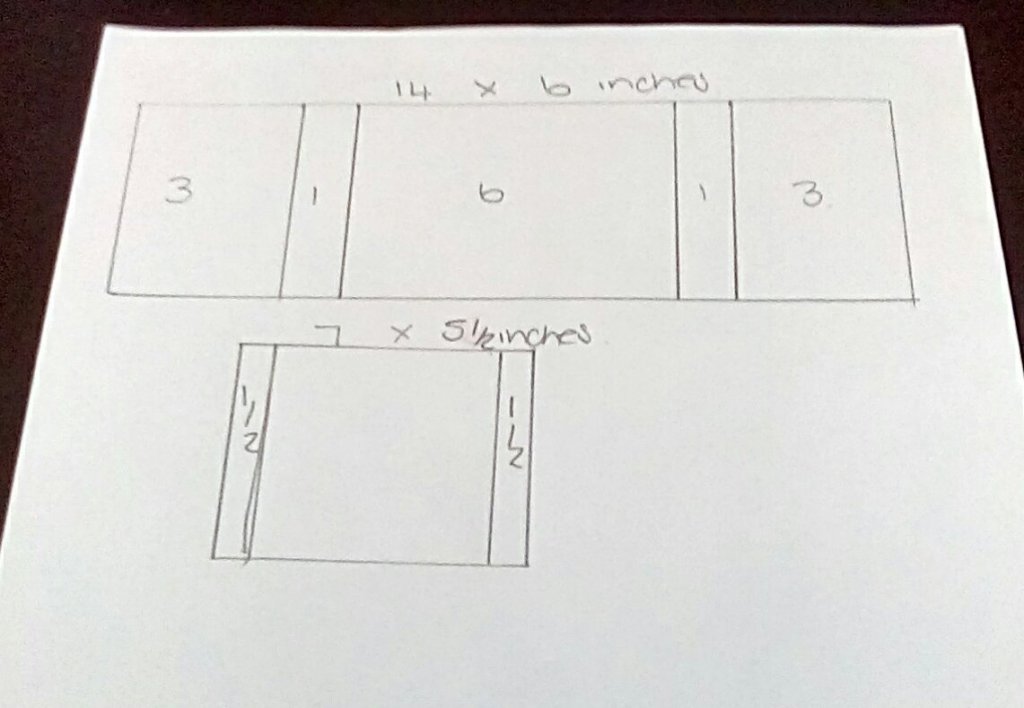
Throughout August we are holding a group challenge based upon a One Sheet Wonder.  If you are lucky enough to have a CMKH Planner some of the measurements in your grid have been tweaked just a little bit.

The idea of this challenge is to create cards/ or a project of your choice with one sheet of 12"x12" patterned paper.  If you wish to use 6" x 6" paper then just halve the measurements.  This challenge is for you to use in any way you wish.  It is your interpretation of the grid.

If you need ideas to get going then take a look at my YouTube video.  I have used the Cottage Life papers from Graphic 45.  Alternatively, you could try stamping on plain paper.  It really is up to you.


Please remember that these measurements are as accurate as possible however you may need to tweak the squares as you work with the paper.  The main thing is to enjoy what you're doing and to share your challenge projects with the group.  I will set up an album specifically for August.


AUGUST CMKH GROUP CHALLENGE IMPERIAL AND METRIC GRID PDF.pdf


Imperial 


Metric


Happy crafting!
Love Elisabeth xx


CREATIVE MINDS KIND HEARTS FACEBOOK GROUP
https://www.facebook.com/groups/creativemindsiikindhearts/


Wednesday, 27 July 2022

 # 50 CORNER BOX POP UP CARD BY LISA SHAW

Wednesday Wonder Summer of Folds #50

Pop up box cards are my worst nightmare - have never liked making them and usually avoid them like the plague, but this one looked so nice that I pushed myself out of my comfort zone to show you how to make this one.


I have done all measurements in inches, so your starting point is one piece of 12x6” cardstock for your base. The 8x2” and the two small tabs I cut out of 180gsm - anything thicker may be hard to work with. (I used Craft Consortium Wood Textures so that I had a ready made wood effect for the box) Cut and fold as per the diagram.


Glue your chosen background paper layers onto the main card. I also covered the reverse of the two 6x4” sections which will end up being the front and back of your finished card. I cut the layers 1/4” smaller than the card. 


To make up the box section, follow the photos above. The strips inside the box are where you will attach your flowers etc. You should be able to see that the two end tabs are folded in opposite directions - one a valley, the other a mountain fold. I attach one tab to the inside of the box and glue down, then attach the other side, making sure that when folded flat/squashed sideways, the box lays flat. 
This is the part I always struggle with, so if you have low tack adhesive you might want to check the box folds flat before putting that final glue on!


This is what your box should now look like and will later be positioned like this - 


The next stage is decoration and for this you will need a selection of foliage and flowers. These are all from Lisa Horton Crafts.


)

I stuck the larger foliage to the base card prior to attaching the box. Next, I attached smaller foliage and flowers to the slats inside the box and also to the front. To create more height, I stuck a piece of acetate to the back of some flowers and then attached the acetate to the slats.

Once happy with your box of flowers, it can be attached to the base card - I glued the back first, making sure that it was right into the fold of the base card. Once firmly stuck, I glued the side section into place.


To finish, I added one flower to the inside (see first photo), layered a piece of paper with sentiment onto the back and then decided on a happy birthday theme for the front. The card should now fold up, but will be quite bulky, meaning it will most likely need a large postage stamp even though it is only 4x6”. Adding a belly band will help to keep the card closed initially, but I decided that it would not add anything to the project. 

I do hope that you will try this style of card. Whilst my card is a birthday card, this would make an ideal get well card, especially for anyone in hospital who cannot have real flowers.


#weeklypromptfloraandfauna   You will need… Cardstock Tape/glue Patterned paper Complimentary dies/die cuts. Make your card with me … Cut yo...