


# 50 CORNER BOX POP UP CARD BY LISA SHAW
Wednesday Wonder Summer of Folds #50
Pop up box cards are my worst nightmare - have never liked making them and usually avoid them like the plague, but this one looked so nice that I pushed myself out of my comfort zone to show you how to make this one.


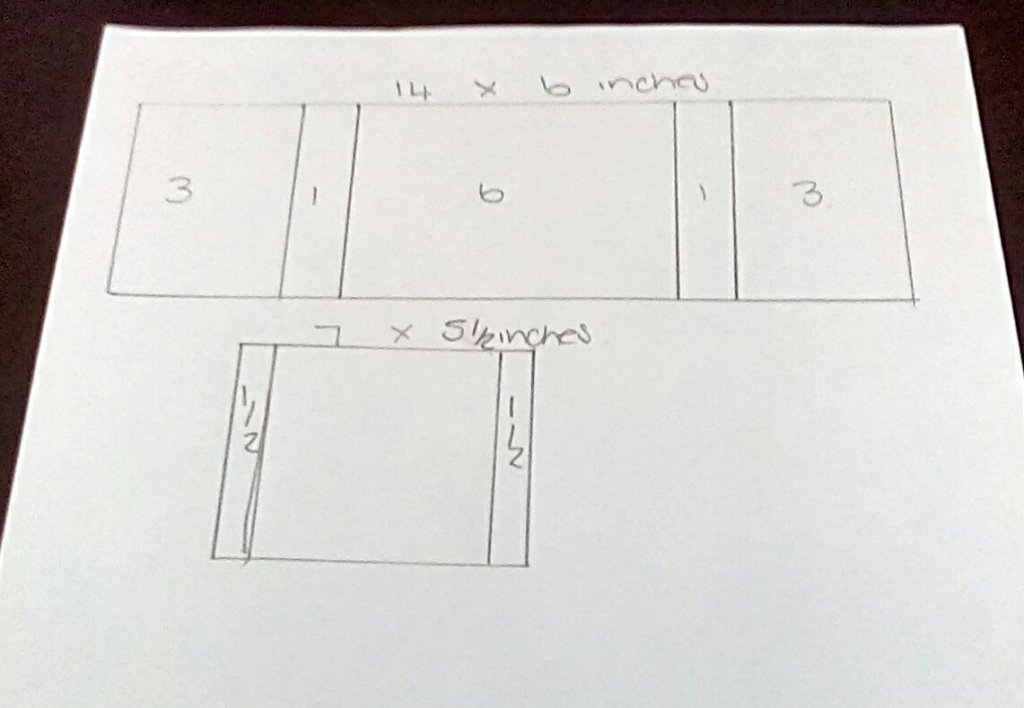
I have done all measurements in inches, so your starting point is one piece of 12x6” cardstock for your base. The 8x2” and the two small tabs I cut out of 180gsm - anything thicker may be hard to work with. (I used Craft Consortium Wood Textures so that I had a ready made wood effect for the box) Cut and fold as per the diagram.

Glue your chosen background paper layers onto the main card. I also covered the reverse of the two 6x4” sections which will end up being the front and back of your finished card. I cut the layers 1/4” smaller than the card.


To make up the box section, follow the photos above. The strips inside the box are where you will attach your flowers etc. You should be able to see that the two end tabs are folded in opposite directions - one a valley, the other a mountain fold. I attach one tab to the inside of the box and glue down, then attach the other side, making sure that when folded flat/squashed sideways, the box lays flat.
This is the part I always struggle with, so if you have low tack adhesive you might want to check the box folds flat before putting that final glue on!

This is what your box should now look like and will later be positioned like this -

The next stage is decoration and for this you will need a selection of foliage and flowers. These are all from Lisa Horton Crafts.

 )
)I stuck the larger foliage to the base card prior to attaching the box. Next, I attached smaller foliage and flowers to the slats inside the box and also to the front. To create more height, I stuck a piece of acetate to the back of some flowers and then attached the acetate to the slats.
Once happy with your box of flowers, it can be attached to the base card - I glued the back first, making sure that it was right into the fold of the base card. Once firmly stuck, I glued the side section into place.


To finish, I added one flower to the inside (see first photo), layered a piece of paper with sentiment onto the back and then decided on a happy birthday theme for the front. The card should now fold up, but will be quite bulky, meaning it will most likely need a large postage stamp even though it is only 4x6”. Adding a belly band will help to keep the card closed initially, but I decided that it would not add anything to the project.
I do hope that you will try this style of card. Whilst my card is a birthday card, this would make an ideal get well card, especially for anyone in hospital who cannot have real flowers.


No comments:
Post a Comment