Tuesday 9 August 2022

Wednesday Wonder #52 by Tracy Shephard

 Hello everyone.

Welcome to my second card for the 'Wednesday Wonder' challenge and I hope you love it as much as I do. 


I think it is a fabulous fold and so versatile. You can change it in so many different ways.

Of course it has to be a bit of a showstopper!

You will need..

cardstock 5 x 20 inches. I used 160gsm.
acetate   5 x 10 inches
Design paper of your choice
plain or coloured card for mat and layering

For the Rosette

cardstock 1 x 15 inches
small circle
center flower decoration

You will also need a large sentiment.

So let's get started...


1. Score your 5 x 20 cardstock along the long side at 5 and 15 inches, fold and burnish.

2. I used three mats for the inside of my card. Each one cut 1/4 inch smaller than the other.

   Pink layer 9 3/4 x 4 3/4
   White layer 9 1/2 x 4 1/2
   Design paper 9 1/4 x 4 1/4

3. For the folds on each side of your card...
I found using a lighter card, made the folding easier. You need sharp, crisp folds and a neat point.

Each flap is 5 x 5 inches. Find the center of the flap and lightly mark it. 


On each side, mark at 2 inches, and 4 1/4 inches. 
Using your scoring tool, starting at the center point, score to each side mark. 


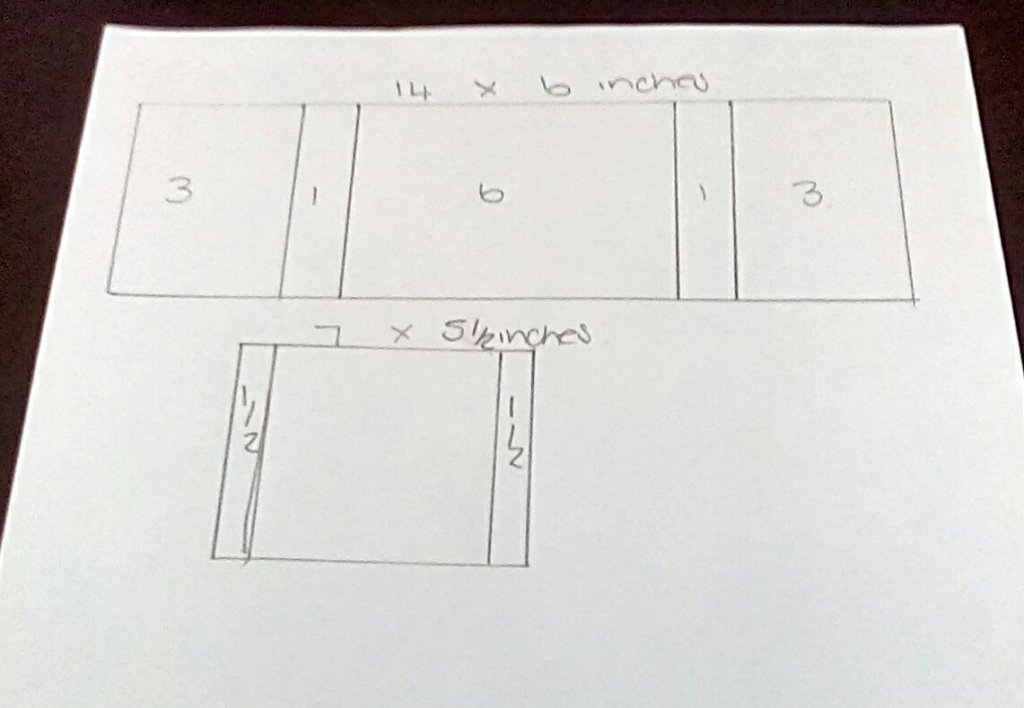
Fold and burnish each scoreline so you get get a lovely crisp edge.

 4. For the mat and layers for the flaps, I used three layers for the triangle..

Pink layer 4 3/4 x 4 3/4

White layer 4 1/2 x 4 1/2 

Design paper 4 1/4 x 4 1/4

I cut each piece as a square, found the center point and cut to each bottom corner. 

5. The pink layers, were a bit more tricky, so take your time... 

You will need 4 of the following shape. 


You can make a template. Using copy paper, make the 5 x 5 flap and fold and cut the piece you need for the layer. This will make it much easier. 

6. Take your 5 x 20 inch acetate and place it on your card with the flaps over it. I used red liner tape to attach the flaps to the acetate. 

7. The Rosette is made by scoring the 1 x 15 inch cardstock and scoring it every 1/4 inch. Concertina fold the scorelines and tape together to make a circle, 

8. Fiddle the Rosette into a neat circle and using hot glue, stick the small cicle to the back. 

Hot glue is brilliant for this purpose, making it quick, easy and less messy. 

Stick a pretty flower to the front of the Rosette, and then , agin using hot glue, place the Rosette to the center points of the front flaps on your card. 

9. Finally, add you sentiment. I used 3D foam pads, which gave it a lift and it stands out beautifully. 


I do hope you will give this a try and I can't wait to see your gorgeous creations.

Happy crafting


Tracy x 


No comments:

Post a Comment

#weeklypromptfloraandfauna   You will need… Cardstock Tape/glue Patterned paper Complimentary dies/die cuts. Make your card with me … Cut yo...