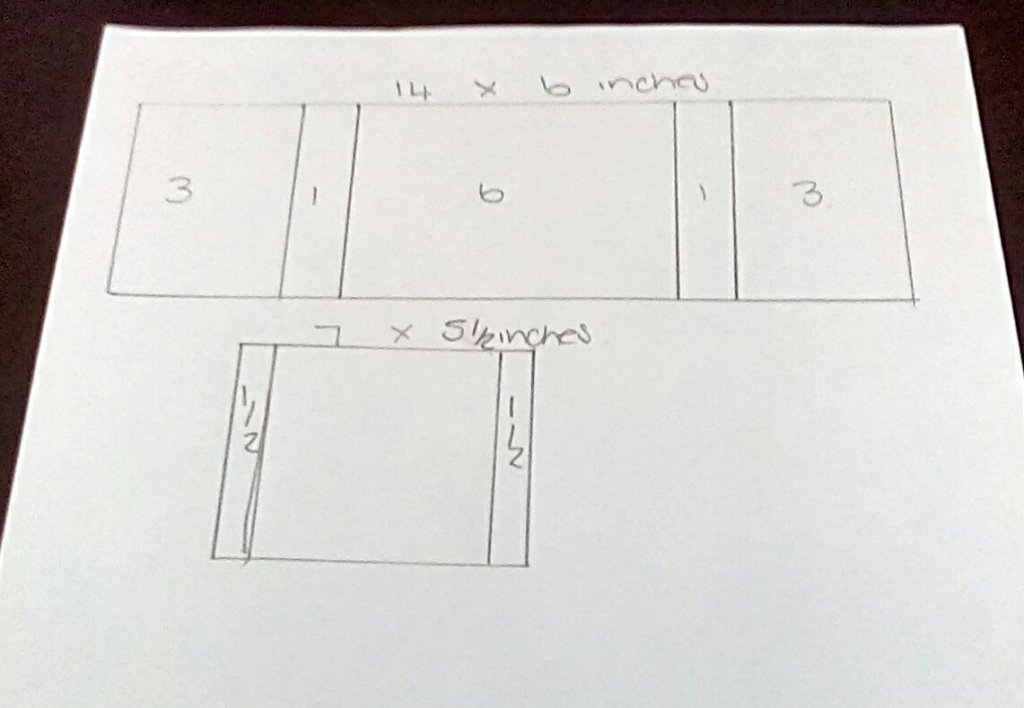
Method

I look forward to seeing your cards. Thank you to Erin Reed for her video and inspiration and happy crafting everyone.
Love Julie


 Posts
All Comments
Posts
All Comments
Triple Easel Card by Angela Stinchcombe
Hello everyone. This is my first blog post for Creative Minds Kind Hearts and I have a beautiful card design to share with you.

To make the 3 easels you will need the following (all sizes in inches):
Base layer | Easel panel | Matts (x2) | Patterned paper (x2) | |
Large easel | 11x5.5 Score at 2.75 & 5.5 on the long edge | 5.5x5.5 | 5.25x5.25 | 5x5 |
Medium easel | 9x4.5 Score at 2.25 & 4.5 on the long edge | 4.5x4.5 | 4.25x4.25 | 4x4 |
Small easel | 7x3.5 Score at 1.75 & 3.5 on the long edge | 3.5x3.5 | 3.25x3.25 | 3x3 |
You will also need a raised ‘stop’ for the small easel plus decorations for each easel layer.
Finished size is 5.5x7.5 so fits a standard 6x8.5 inch envelope.
· Fold & burnish all folds as mountains.
· Glue the bottom half of the easel panel to your base layer front section (use wet glue on the folded face only), lining up the front edges carefully
· Glue each matt, then patterned layer in place (1 matt & patterned piece sits on the easel ‘face’, the other on the base) [

· Glue the medium easel onto the largest easel centrally so that the front sits 1” forward – easiest done with the easel open. You may prefer to use red tape here.

· Glue the small easel 1” forward of the medium easel in the same way

· Decorate your layers so that it all folds flat for posting (to fold lay the small easel flat, lay the medium easel over the top, then the large over the medium)


The same instructions can be used for circles or hearts but if die-cutting the shapes remember to place the die over the crease for your base layers to leave a hinge, then cover with the easel panel.
For a different look try placing the square easels off to one side so not so regimented, or use mirror card for matts…….
I would love to see your versions of this Triple Easel card so please share your makes on the Creative Minds Kind Hearts Facebook Group.
Love
Angela
Welcome to Creative Minds Kind Hearts’
41st Wednesday Wonder - the Triple Fold Card
By Lisa Shaw
This week sees what is possibly one of the easiest folds you will ever make, yet it is very effective once finished.

I have used an old Craftwork Cards set of papers called Countryside to decorate this card. The template below should enable you to make this card using basic cutting and measuring tools, with possibly a die or two for the embellishment.


I hope that this will give you the inspiration to make a card in this style.
Love Lisa xx
HOW TO CREATE A Z -FOLD POP UP CARD

YOU WILL NEED
BASE CARD 8 1/2" BY 5 1/2" SCORE AT 2 1/8" AND 4 1/4" TO CREATE A Z-FOLD CARD
FRONT RECTANGLE PANELS 2 MAT LAYERS - 5 1/4" X 1 7/8"
FRONT TOPPERS 2 MAT LAYERS - 1 3/4" X 1 3/4"
FRONT TOPPERS 2 WHITE CARD PIECES - 1 5/8" X 1 5/8"
MIDDLE AND BACK 2 MAT LAYERS - 2 3/4" X 2 3/4"
MIDDLE AND BACK 2 WHITE CARD PIECES - 2 3/4"X 2 3/4" (CUT 1 PIECE DIAGONALLY)
CORNER PANELS 2 PATTERN PIECES - 2 " X 2" (CUT DIAGONALLY)


2. Stick the four co-ordinating triangles ( 2 COMPLIMENTARY PIECES - 2 " X 2" CUT DIAGONALLY) to the corners of the back of the card. I found that liquid glue makes it easier to align the triangles to the corners.


Welcome to this weeks Wednesday Wonder, which is a Double Reverse Shutter card


As you may know I do love a good tag so today have done a little fold out tag tutorial for you, perfect for gift cards, little notes or an alternative to a card.

My folded tags measure 3"x6" but you can adapt this to make tags as small or large as you like. I cut a 9 3/8" x 6" sheet of card then scored along the longest edge at 3", 3 2/8", 6 2/8" and 6 3/8".

To cut the tag shape I marked 1/2" in and 1/2" down from each top corner then cut between these to remove the corners.
I then used a chestnut brown ink around the tags front and back to give it a more vintage look.

I then cut patterned paper from my vintage dreams paperpad into 5 tags measuring 2 3/4" x 5 3/4", 3 Small tags measuring 1 1/2" x 2 3/4" and a 1 1/2" x 6" strip of paper.

I used 2 of the large tags to decorate the inside of the folded tag. For the strip I layed out the small tags against the back of the paper and marked between the tags before gluing along the marked lines and sticking into the middle inside tag to make 3 slots for the little tags.


I attached a ribbon to tie my tag so I glued this into place then secured with double sided tape before decorating the front and back covers with the other large tags.


Look forward to seeing all your crafty makes 😊
Two
tents are better than one!
You will
need:

This design
works well for circular or square toppers but start with the one you want you
use. Today I have a square topper cut from 12 x 12 sheet of Sandy paws papers
designed by Helz Cuppelditch for Craft Consortium. This will fit exactly onto a
premade 4” card blank or I could trim it and mat with the same contrasting
paper onto a 4 ¼ “, which I decided to do.
To cut
aperture:
If you have a square die 3 3/8 or 8.5cm cut this centrally into the card front, or use a scalpel or trimmer leaving a 1 1/8 or 3cm frame outside. Tip- this is exactly the width of my metal ruler.


Check each side to ensure they fit and trim if necessary, before adhering, especially if you have die-cut the aperture.


Mat (and layer)
the topper onto smaller card base ensuring it is tent fold. Place this
centrally inside main card, lifting and checking all correct before adding
glue. I use Collall wet glue here and don’t press down, lifting outer card to
check it is straight from inside too. If desired, you can add stamps to inside of
card too.
Voilà!


Happy
Crafting!
Lesley
 I'm Lesley and I've been a crafter all my life. I discovered paper crafting about 30 years ago and this is now my great passion.
#weeklypromptfloraandfauna You will need… Cardstock Tape/glue Patterned paper Complimentary dies/die cuts. Make your card with me … Cut yo...