


If you are anything like me then you probably have a stash of peel offs squirrelled away....I've had mine since I first started making cards so probably around 25 years......
I don't tend to use them when I'm making my cards anymore but was reluctant to get rid of them so thought I would have a play and see if I could use them to create a background for a card.
I've decided to make a Christmas card for this project but the technique would work equally well with different peel offs for any occasion that you have in mind and in any colour scheme.
Here is a list of the supplies that I've used for this card.
A6 Card blank - Jade
White Super Smooth card
Selection of Peel offs - Im using lines, snowflakes and stars
Distress Ink - Wilted Violet, Tumbled Glass
WOW Super fine Embossing Powder - Opaque White
Posca Pen - White
Sugar and Spice Crafts Sequins - Unicorn
Cardboard packaging - or you could use craft foam, foam pads, 3D glue gel
Stickle - Star Dust
Here is my detailed step by step showing how I created the card....there are some hints and helpful tips throughout the tutorial too !
Step1.

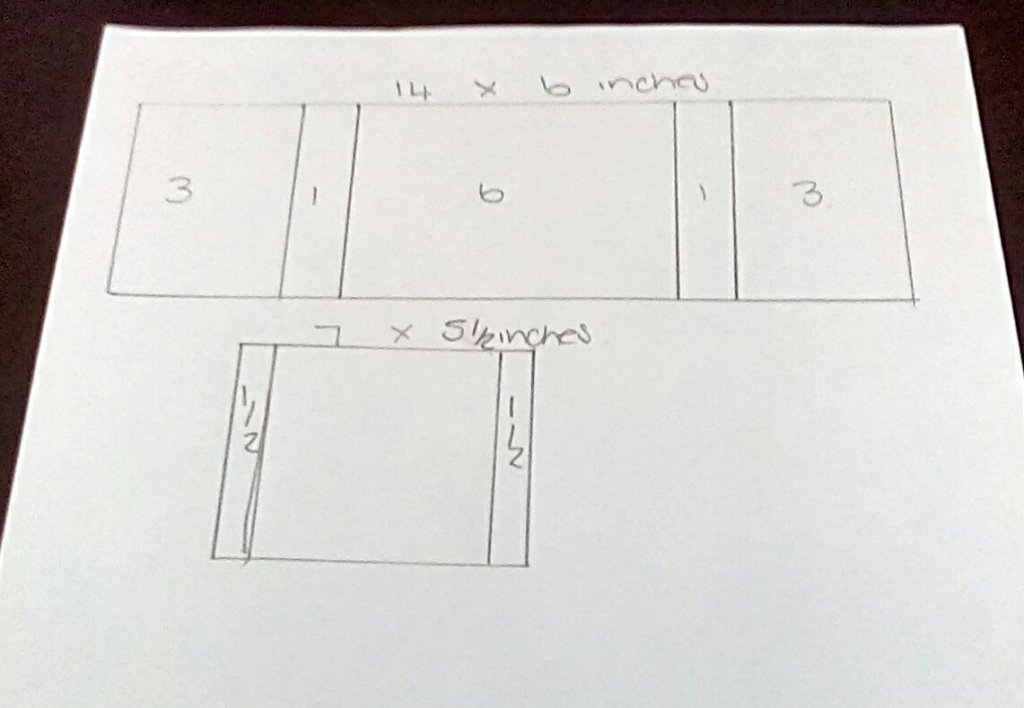
Each piece is then scored in half at 4 1⁄8 “ or 105 mm to create two card A6 card blanks.
Remember when you have scored your card this creates a valley, to get a nice crease in your card fold this into a mountain fold.
Next cut the panel of super smooth white card to approximately 4”x 5 3⁄4” or 100 mm x 144 mm this will leave a nice contrasting border around the background. You can use different types of card for this technique but I found that the super smooth card does not tear when you remove the peel offs. Set the card blanks to one side whilst you create the background piece..
Step 2.

Next secure the background card to a glass mat or to your work mat, this helps to keep everything lined up.
Use a set square to add the first diagonal peel off across the corner.
I like to use the edge of the set square and the lines on my glass mat to line it up.
You can of course do this by eye but I used to be an Engineer so it has to be right.....a touch OCD maybe ? ....probably why my cards take so long to make sometimes.

Continue to add the peel offs to create the design that you want on the background.
I’ve added the three stripes across the bottom corner of my design and randomly added snowflakes and stars.
Next for the fun bit - adding some colour !
Step 3.
I have used Distress Inks in Tumbled Glass and Wilted Violet.
I like this combination as it blends well together and gives a wintery feel - perfect for a snowy Christmas card.

Obviously there are lots of other colour combinations that you could try...my other favourite more vibrant combination is Picked Raspberry and Squeezed Lemonade I first added Tumbled Glass using a foam blending tool to blend the ink in small circles across the whole piece but you can use whatever type of applicator you like to use to give a smooth finish.
Remember to turn your piece of card around to make it easier to
blend your ink and blend gently over the peel offs so they don't lift off
the card before you are finished.

It doesn't have to be a perfectly blended application of colour as this is just the first step.
Next I added Wilted Violet around the outside of the piece in the same way taking care when you blend over the peel offs around the edge.
Step 4.
Next add some extra detail to the piece by gently splashing or flicking water over it. Add as much or as little as you like to get the effect that you want.

Allow the water to sit on the card for a minute and then mop up any excess with a clean tissue or kitchen roll. This will lift off some of the distress ink.
This technique is often called faux bleaching.
Allow the card to dry naturally before moving on - if you use a heat gun at this point it may cause the peel offs to lift off the card.
Step 5.

Once the card has dried use a white Posca pen to add splashes of paint over the background.
I gently tap the pen with a ruler to do this again adding as much white as you want.
You can also use acrylic paint but depending on the thickness of the paint you may need to add a little water to be able to flick or splash it on to the background.
Be prepared as the paint splashes generally make a mess so remember to protect your work surface.
Leave the background to one side to dry.
Step 6.

Once the paint has dried very carefully remove the peel offs to reveal the design.
A craft knife may help do this if you don't have any fingernails.
If you are careful you can generally use the same peel offs for 3 or 4 cards before they need throwing away.
Step 7.

Next you will cut a diagonal line across the card, towards the bottom, using a craft knife, guillotine or paper trimmer.
Use the diagonal lines at the bottom right hand corner of the card as a guide to make sure that the cut is parallel.
Step 8.

The next step is to stamp the sentiment onto the card blank.
Line up the smaller bottom section of the background panel on the card blank and use this as a guide to position the stamp.
When you are happy with the position, carefully transfer this to a stamping platform if you have one and pick up the stamp with the lid of the platform as normal. You can also stamp the sentiment using an acrylic block.

For this design I chose to use a white embossing powder. Remember to use an anti static bag to rub over the card blank before applying the embossing ink.
Apply a sticky embossing ink to the stamp and then stamp onto the card blank.
Next apply the embossing powder, remove any stray flecks of powder before heat setting.
Remember to make sure the heat gun is hot before using it and apply heat to the underneath of the card, this will give a smoother finish to the embossing.
Step 9.

Once the embossing has cooled the card can be assembled.
We want to create an aperture, so the top panel of the background piece will need to be trimmed to fit the card blank .
The amount that you need to trim off will depend on the width of the panel that you need to allow the sentiment to show.
Line up the top and bottom panels on the card blank and trim to size so that you have the same border around the card.
Step 10.

I wanted the background panels to be raised off the card so I adhered pieces of cardboard to the back before sticking to my card.
I like to reuse and upcycle and packaging is perfect for this.
You could use craft foam, foam pads or 3D glue gel to get the same effect.
Step 11.

I really hope that you like this idea and look forward to seeing your creations - please share them in our Facebook Group - Creative Minds Kind Hearts.
Love and Crafty Hugs Wendy x
I


Great tutorial Wendy 😊
ReplyDelete